Introduction to the Alicia-M Imitation Learning System
LeRobot provides a unified framework covering the complete lifecycle of robot learning, with functionality spanning the four stages of data collection, model training, algorithm verification, and deployment, helping researchers and developers efficiently achieve closed-loop development from perception to control. Below is an imitation learning example based on the Alicia-D / Alicia-M teleoperation kit on LeRobot.
1. Installation and Environment Preparation
1.1 Create a Python Environment
conda create -n lerobot python=3.11 -y
conda activate lerobot
1.2 Install Dependencies
git clone https://github.com/Synria-Robotics/lerobot.git -b v6.1.1-beta
cd lerobot
pip install -e .
Verify the installation:
lerobot-record --help
lerobot-train --help
If no "not command" related messages appear, LeRobot has been installed successfully.
1.3 Verify the Alicia SDK
python -c "import alicia_d_sdk, alicia_m_sdk; print('Alicia SDKs OK')"
If you see:
Alicia SDKs OK
both SDKs have been installed correctly.
If an error occurs here:
Install the SDKs separately, then run the SDK verification in step 4 again after installation.
pip install alicia-m-sdk
pip install alicia_d_sdk
The environment above only needs to be installed once.
2 Single Teleoperation Kit Block Grasping
Equipment / items used:
- Alicia-M follower arm;
- Alicia-DL teaching arm;
- Two D405 RealSense cameras;
- A 2.5 cm x 2.5 cm cube;
- A storage box;
2.1 Activate the Environment
cd lerobot
conda activate lerobot
2.2 Port Detection
Connect the two cameras to the computer, preferably to two of the computer's USB ports. Do not connect both cameras to a single hub, as insufficient power may prevent images from being read; (if you connect both to a hub, additional power supply is required).
2.2.1 Camera Detection
python examples/camera/camera_detection.py
After running, it will print out the camera ports, which are video5 and video12 respectively.
Found 2 usable camera stream(s).
Press 'q' in the video window to cycle to the next camera.

Displaying Camera 1/2: TSTC USB20 WEB CAMERA on /dev/video5
Closing feed for TSTC USB20 WEB CAMERA.

Displaying Camera 2/2: Intel(R) RealSense(TM) Depth Ca (usb-0000 on /dev/video12
Closing feed for Intel(R) RealSense(TM) Depth Ca (usb-0000.

All camera streams have been shown. Exiting.
Then run the following to view detailed camera information:
lerobot-find-cameras opencv
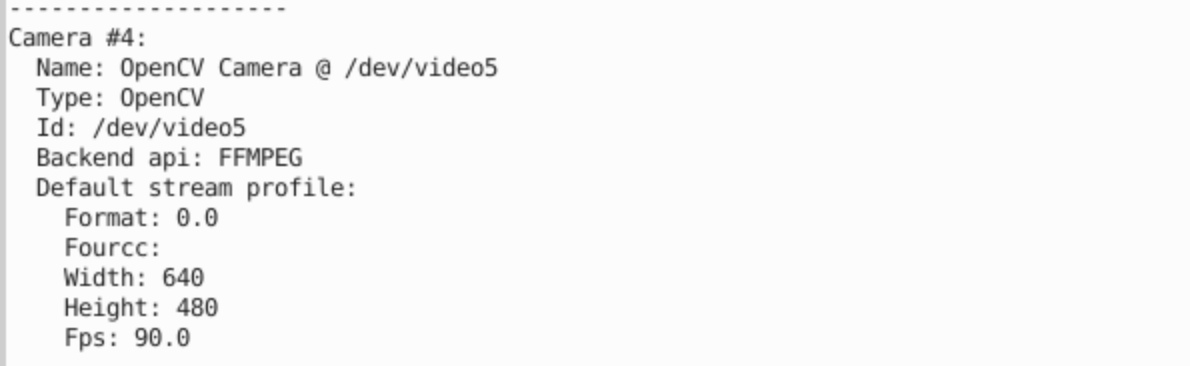
Find the corresponding camera, for example video5, which shows Width and Height both as 640 * 480 here, for later use.
2.2.2 Detect the Robotic Arm Serial Port
First connect the follower arm to the computer via USB, then run:
ls /dev/ttyACM*
It will show ttyACM0. Then connect the teaching arm and run the above command again; you will see ttyACM0 ttyACM1. Therefore, the follower arm corresponds to ttyACM0 and the teaching arm corresponds to ttyACM1.
Note: The device numbering order is not fixed, so use the actual detection results as the reference. Do not assume that the follower arm Alicia-M is always /dev/ttyACM0.
2.3 Data Collection
2.3.1 Collection Test
It is recommended to record 1 episode first as a self-check.
The following command is suitable for performing a round of device connectivity check first:
The parameters that require attention are --robot.port, --robot.cameras, and --teleop.port. These must correspond correctly; they are exactly what was detected above, and only when they match can collection proceed smoothly.
lerobot-record \
    --robot.type=alicia_m_follower \
    --robot.port=/dev/ttyACM0 \
    --robot.cameras="{front: {type: opencv, index_or_path: /dev/video5, width: 640, height: 480, fps: 30}, wrist: {type: opencv, index_or_path: /dev/video12, width: 640, height: 480, fps: 30}}" \
    --robot.id=alicia_m \
    --teleop.type=alicia_d_leader \
    --teleop.port=/dev/ttyACM1 \
    --teleop.gripper_type=50mm \
    --teleop.directly_controls_robot=false \
    --teleop.target_follower_type=alicia_m \
    --teleop.id=alicia_d \
    --dataset.repo_id=user/pick_and_place_v0 \
    --dataset.root=data/pick_and_place_v0 \
    --dataset.num_episodes=1 \
    --dataset.single_task="pick and place" \
    --dataset.episode_time_s=30 \
    --dataset.reset_time_s=15 \
    --display_data=true \
    --dataset.push_to_hub=false
After confirming that the action directions, cameras, and serial ports are all normal, increase --dataset.num_episodes to start formal collection. Since data/pick_and_place_v0 already exists, you can either delete it first, or modify the following parameter at runtime: change --dataset.root=data/pick_and_place_v0 to --dataset.root=data/pick_and_place_v1.
2.3.2 Formal Collection
lerobot-record \
    --robot.type=alicia_m_follower \
    --robot.port=/dev/ttyACM0 \
    --robot.cameras="{front: {type: opencv, index_or_path: /dev/video5, width: 640, height: 480, fps: 30}, wrist: {type: opencv, index_or_path: /dev/video12, width: 640, height: 480, fps: 30}}" \
    --robot.id=alicia_m \
    --teleop.type=alicia_d_leader \
    --teleop.port=/dev/ttyACM1 \
    --teleop.gripper_type=50mm \
    --teleop.directly_controls_robot=false \
    --teleop.target_follower_type=alicia_m \
    --teleop.id=alicia_d \
    --dataset.repo_id=user/pick_and_place_v0 \
    --dataset.root=data/pick_and_place_v0 \
    --dataset.num_episodes=30 \
    --dataset.single_task="pick and place" \
    --dataset.episode_time_s=30 \
    --dataset.reset_time_s=15 \
    --display_data=true \
    --dataset.push_to_hub=false
Running this collection code mainly serves to collect 30 episodes of data (--dataset.num_episodes=30). This dataset is mainly about grasping and placing blocks (--dataset.single_task="pick and place"). The maximum duration of each episode is 30s (--dataset.episode_time_s=30). After collecting one episode, there will be a 15s environment reset time to reposition the block (--dataset.reset_time_s=15). A window will be displayed to view the collected images and robotic arm information (--display_data=true). By default it is not uploaded to the hub (--dataset.push_to_hub=false) and is only saved locally. After collection ends, the data will be saved to this project's data/pick_and_place_v0 (--dataset.root=data/pick_and_place_v0).
The figure below is the Rerun visualization page.
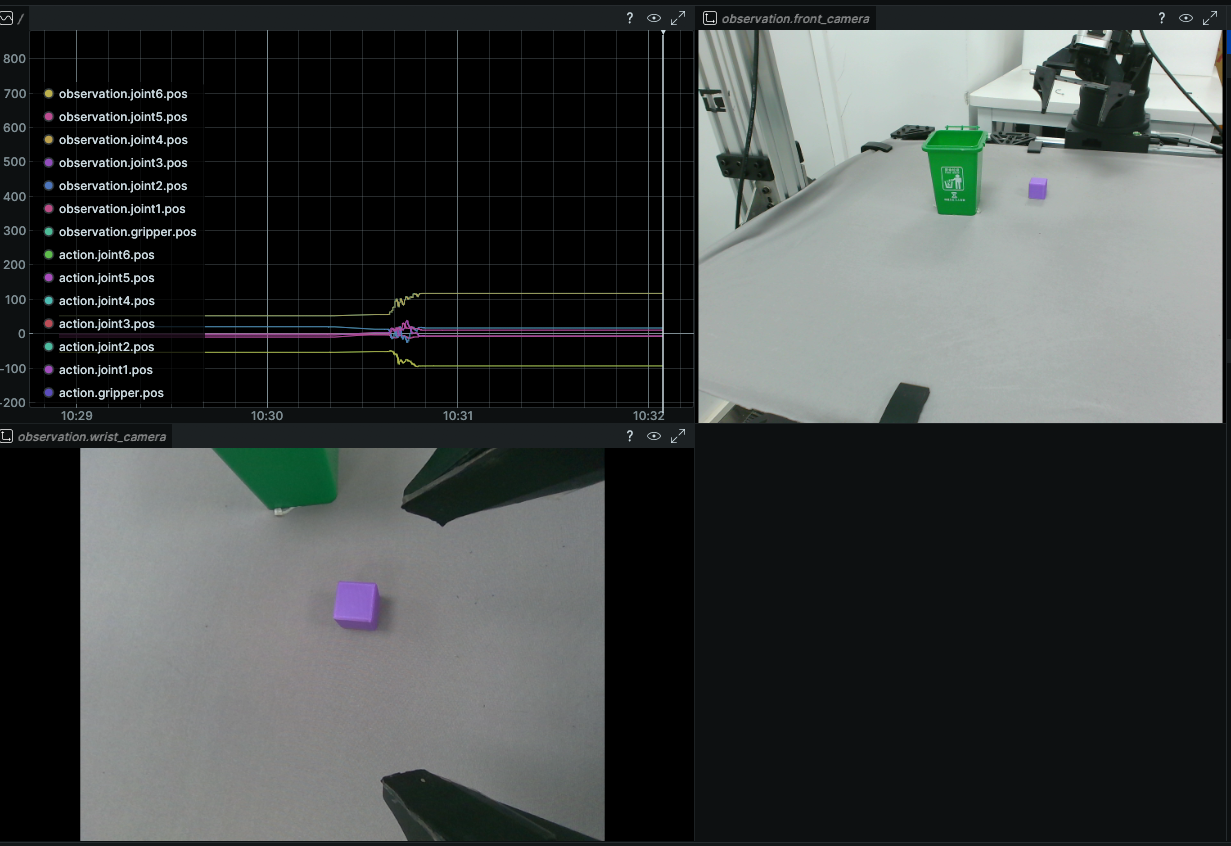
During recording:
-
Press the arrow key
<-to re-record the current episode -
Press the arrow key
->to end the current episode recording (if I finish the task ahead of time, I can press this to end early) -
Press ESC to stop recording
2.3.3 Continue Collection
To continue appending episodes to an existing dataset, you can use:
lerobot-record \
    ... \
    --resume=true
When resuming recording, the parameters must be consistent with the original dataset; add --resume=true at the end.
If they are inconsistent, LeRobot will report Dataset metadata compatibility check failed.
2.3.3 Detailed Parameter Descriptions
Robot Parameters
| Parameter | Value in This Example | Function |
|---|---|---|
--robot.type | alicia_m_follower | Specifies that the controlled device is the Alicia-M follower. |
--robot.port | /dev/ttyACM0 | The serial port device of the Alicia-M. In actual use, follow the port detection results. |
--robot.cameras | The two cameras front and wrist | Configures the recording cameras. front and wrist are camera names; type: opencv indicates using an OpenCV camera; index_or_path is the video device path; width, height, and fps indicate resolution and frame rate respectively. It is recommended to keep the camera names consistent across the recording, training, and inference stages. |
--robot.id | alicia_m | The robot instance ID, used to distinguish devices, and also affects the calibration file and log identifier. |
Teleop Parameters
| Parameter | Value in This Example | Function |
|---|---|---|
--teleop.type | alicia_d_leader | Specifies that the teaching device type is the Alicia-D leader. |
--teleop.port | /dev/ttyACM1 | The serial port device of the Alicia-D leader. In actual use, follow the port detection results. |
--teleop.gripper_type | 50mm | The gripper specification of the Alicia-D, which must match the actual hardware. |
--teleop.directly_controls_robot | false | Indicates that the Alicia-D does not control the follower directly through a hardware cable, but instead the computer reads the actions and forwards them to the Alicia-M. |
--teleop.target_follower_type | alicia_m | Indicates that the joint values read by the Alicia-D should be mapped according to the Alicia-M's joint convention before output. |
--teleop.id | alicia_d | The teaching device instance ID, used to distinguish devices and identify logs. |
Dataset Parameters
| Parameter | Value in This Example | Function |
|---|---|---|
--dataset.repo_id | user/pick_and_place_v0 | The logical identifier of the dataset, usually in the format username/dataset_name. Even if it is only saved locally, it is recommended to fill in this field in this format. |
--dataset.root | data/pick_and_place_v0 | The local dataset save directory. |
--dataset.num_episodes | 30 | The number of episodes to record, i.e., how many teaching data episodes to collect. |
--dataset.single_task | "pick and place" | The task text description, which is written into the dataset. This parameter must be provided. |
--dataset.episode_time_s | 30 | The maximum recording duration of each episode, in seconds. |
--dataset.reset_time_s | 15 | The time left for manually resetting the scene after each episode ends, in seconds. |
--dataset.push_to_hub | false | After recording ends, do not automatically upload to the Hugging Face Hub; only save locally. |
Other Parameters
| Parameter | Value in This Example | Function |
|---|---|---|
--display_data | true | Displays the current observations and actions in Rerun for easy debugging. It does not change the dataset content and only affects visualization. |
2.4 Policy Training
The goal of this part is to train the teaching data just recorded into a policy model that can automatically complete grasping and placing.
2.4.1 Pre-Training Checks
- First confirm that the dataset has been recorded, e.g., the dataset directory in this example is
data/pick_and_place_v0 - The
--dataset.repo_idand--dataset.rootin the training command must be consistent with those used during recording - It is recommended to record at least
20-30episodes; for more stable results,50or more is recommended - If the training machine has an NVIDIA GPU, use
--policy.device=cuda; if there is no GPU, you can change it tocpu, but the speed will be noticeably slower - For the first training, it is recommended not to modify too many parameters at once; first follow the documentation to run through it once
2.4.2 Train ACT (Recommended to Start Here)
lerobot-train \
    --dataset.repo_id=user/pick_and_place_v0 \
    --dataset.root=data/pick_and_place_v0 \
    --dataset.video_backend=pyav \
    --policy.type=act \
    --policy.device=cuda \
    --policy.push_to_hub=false \
    --output_dir=outputs/train/act_pick_and_place \
    --job_name=pick_and_place \
    --batch_size=16 \
    --steps=50000 \
    --save_freq=5000 \
    --log_freq=100 \
    --eval_freq=0
The meaning of the above command can be simply understood as:
--policy.type=act: Train anACTmodel--dataset.repo_idand--dataset.root: Specify which local dataset to read--output_dir: The location where the training results are saved--batch_size=16: Read 16 batches of data per training step; if there is insufficient video memory, you can change it to8,4, or even2--steps=50000: The total number of training steps; this value is fine to use the first time--eval_freq=0: Turn off simulation environment evaluation and only do offline training
During training, the terminal will continuously print logs and loss. Fluctuations in loss are normal; as long as there are no continuous errors or NaN, training can usually continue.
After training is complete, focus on this directory:
outputs/train/act_pick_and_place/checkpoints/last/pretrained_model
If you can see the following files in this directory, the model has been saved successfully:
config.jsonmodel.safetensorstrain_config.json
2.4.3 ACT Continued Training / Resume from Checkpoint
If training is interrupted, or you want to continue training the 50000 steps to 100000 steps, you can run:
lerobot-train \
    --config_path=outputs/train/act_pick_and_place/checkpoints/last/pretrained_model \
    --resume=true \
    --steps=100000 \
    --save_freq=5000 \
    --log_freq=100
Note here:
--config_pathshould point to thepretrained_modeldirectory, or directly to thetrain_config.jsoninside it- Do not write the path as the
.../checkpoints/050000level, otherwise it will easily fail to find the config file - When continuing training, you usually do not need to repeat all parameters such as the dataset and model type
2.4.4 ACT Inference
Inference means letting the trained model take over the Alicia-M and automatically execute the task.
Before the first inference, it is recommended to do these 4 things:
- Clear away clutter around the robotic arm that could easily cause collisions
- Keep the camera position, block placement, and starting pose as close as possible to the state when the data was recorded
- First run only
1episode to confirm that the action direction and speed are normal - Be ready to cut power or do an emergency stop at any time; do not run continuously for a long time at the start
It is recommended to first run the following command for a minimal verification:
lerobot-record \
    --policy.path=outputs/train/act_pick_and_place/checkpoints/last/pretrained_model \
    --policy.device=cuda \
    --robot.type=alicia_m_follower \
    --robot.port=/dev/ttyACM0 \
    --robot.cameras="{front: {type: opencv, index_or_path: /dev/video5, width: 640, height: 480, fps: 30}, wrist: {type: opencv, index_or_path: /dev/video12, width: 640, height: 480, fps: 30}}" \
    --robot.id=alicia_m \
    --teleop.type=alicia_d_leader \
    --teleop.port=/dev/ttyACM1 \
    --teleop.gripper_type=50mm \
    --teleop.directly_controls_robot=false \
    --teleop.target_follower_type=alicia_m \
    --teleop.id=alicia_d \
    --dataset.repo_id=temp/eval_act_pick_and_place \
    --dataset.root=data/eval_act_pick_and_place \
    --dataset.num_episodes=1 \
    --dataset.single_task="pick and place" \
    --dataset.episode_time_s=30 \
    --dataset.reset_time_s=15 \
    --display_data=true \
    --dataset.push_to_hub=false
This command is very similar to the dataset recording command, but the most critical new parameter in the inference stage is:
--policy.path=.../pretrained_model: Indicates that this time it is not manual teaching, but loading the trained ACT model to control the robot
Below, the inference command is broken down by purpose, so that later when you change models, change cameras, or do safety tuning, it will be easier to know which item to modify.
Model Loading Parameters
| Parameter | Value in This Example | Function and Modification Advice |
|---|---|---|
--policy.path | outputs/train/act_pick_and_place/checkpoints/last/pretrained_model | Points to the policy directory to load. This must be the pretrained_model level, and the directory must contain at least config.json, model.safetensors, and train_config.json. If you want to test a specific checkpoint, you can change last to a specific step directory, e.g., 050000/pretrained_model. |
--policy.device | cuda | Specifies which device the model runs inference on. It is recommended to prefer cuda for lower action latency; if the current machine has no available NVIDIA GPU, you can change it to cpu, but the control response will be noticeably slower. |
Robot and Observation Parameters
| Parameter | Value in This Example | Function and Modification Advice |
|---|---|---|
--robot.type | alicia_m_follower | Specifies that the device controlled by ACT is the Alicia-M follower. This parameter must match the actual hardware type. |
--robot.port | /dev/ttyACM0 | The serial port of the Alicia-M. This value may change after switching USB ports, so it is best to reconfirm it before inference. |
--robot.cameras | The two cameras front and wrist | This is one of the parameters that most affect inference results. Names like front and wrist are not written arbitrarily; they correspond to the observation key names used during model training. In the inference stage, it is best to keep the same camera names, resolution, frame rate, and mounting positions as during recording, otherwise the input distribution the model sees will change and the success rate will usually drop. |
--robot.id | alicia_m | The robot instance ID, mainly used to distinguish devices and associate logs/configuration. It is usually fine to keep the same value as used during data recording. |
--robot.max_relative_target | Not written in this example; it is recommended to append 8 for the first inference | This is a commonly used safety limiting parameter, used to limit the magnitude of the relative target change allowed per control cycle. The smaller the value, the slower and more conservative the action; the larger the value, the faster the action, but more prone to sudden jumps. For the first deployment, it is recommended to start with a smaller value. |
If the action magnitude is too large during the first inference and seems unsafe, you can first add:
--robot.max_relative_target=8
Teleop-Related Parameters
| Parameter | Value in This Example | Function and Modification Advice |
|---|---|---|
--teleop.type | alicia_d_leader | Specifies the teaching arm device type. The example still initializes with this Alicia-D leader configuration. |
--teleop.port | /dev/ttyACM1 | The serial port of the Alicia-D leader. Like --robot.port, it must be reconfirmed after switching ports. |
--teleop.gripper_type | 50mm | The teaching arm gripper specification, which must match the actual hardware. |
--teleop.directly_controls_robot | false | Indicates that the Alicia-D does not directly drive the Alicia-M through a sync cable, but instead the computer uniformly reads in and forwards the control logic. If your wiring method is different, this parameter must also be changed accordingly. |
--teleop.target_follower_type | alicia_m | Specifies that the leader's joint data should be mapped according to the Alicia-M's joint convention. If this value is wrong, the action direction or joint correspondence may be abnormal. |
--teleop.id | alicia_d | The teaching device instance ID, used for logs and device distinction. It usually does not need frequent modification. |
Evaluation Data and Episode Control Parameters
| Parameter | Value in This Example | Function and Modification Advice |
|---|---|---|
--dataset.repo_id | temp/eval_act_pick_and_place | The logical identifier of the evaluation data. What is saved here is the evaluation data produced when the model automatically executes, not the training weights themselves. |
--dataset.root | data/eval_act_pick_and_place | The local evaluation data directory. After inference ends, you can review the execution results of each episode here. |
--dataset.num_episodes | 1 | How many episodes to run automatically this time. For the first debugging, it is recommended to set it to 1 first, and increase it after confirming the actions are normal. |
--dataset.single_task | "pick and place" | The current task description. It is recommended to keep it consistent with the task semantics of the training data, to facilitate later review, filtering, and comparison of evaluation results. |
--dataset.episode_time_s | 30 | The maximum duration of a single episode. Too short may force an end before the task is finished; too long increases risk when the model behaves abnormally. |
--dataset.reset_time_s | 15 | The time given for manually resetting the scene after an episode ends. Increase this value when the block needs to be repositioned and the robotic arm needs to return to a safe starting point. |
--dataset.push_to_hub | false | After inference ends, do not upload to the Hub; only save locally. For the first verification, it is recommended to keep it as false. |
--display_data | true | Opens the visualization window, making it convenient to observe the camera feed, robot status, and action output. It is recommended to enable it for the first inference, as it makes troubleshooting more intuitive. |
How to Tune for the First Inference
A relatively reliable debugging order is:
- Keep
--dataset.num_episodes=1and--display_data=true, and only do a one-episode short verification. - If the action is too aggressive, first lower
--robot.max_relative_target; if the action is clearly too slow, then gradually increase it. - After confirming that the action direction, grasp timing, and reset flow are all normal, increase
--dataset.num_episodesfor continuous evaluation.
If the model can load normally, the robotic arm starts acting based on the camera feed, and the evaluation data directory is successfully generated, the ACT inference flow has been successfully run through.