Synria Follower Arm ROS2 Humble
1. Introduction
Alicia-M ROS2 is a ROS 2 workspace for controlling the Synria Alicia-M series robotic arms. The project is based on ROS 2 Humble and provides a complete control chain from the low-level driver to high-level planning, covering core capabilities such as hardware startup, MoveIt motion planning, model visualization, hand-eye calibration, and block grasping.

1.1 Main Features
- ros2_control driver integration: Implements robotic arm hardware control based on serial communication.
- MoveIt2 support: Supports motion planning and execution.
- RViz visualization: Supports robotic arm model display and interactive visualization.
- Hand-eye calibration: Supports the eye-in-hand calibration workflow (adapted for the Intel RealSense D405) and calibration result verification.
- Example scripts: Provides Python examples (such as Pick and Place).
- Project practice: 2D block sorting (to be developed) and a 6D grasping workflow based on GraspGen (Nvidia, 2025).
1.2 Project Structure
src/
├── alicia_m_bringup/          # Robotic arm hardware and MoveIt launch entry
├── alicia_m_calibration/      # Hand-eye calibration and verification scripts
├── alicia_m_descriptions/     # URDF, mesh, RViz display configuration
├── alicia_m_driver/           # ros2_control hardware driver (serial communication)
├── alicia_m_grasp_6d/         # 6D grasping module (to be developed)
├── alicia_m_moveit_config/    # MoveIt2 configuration and controller configuration
└── examples/                  # MoveIt example scripts
2. Installation and Compilation
2.1 Environment Requirements
- Ubuntu 22.04
- ROS2 Humble
2.2 Get the Source Code and Compile
mkdir -p ~/Alicia-M-ROS2/src
cd ~/Alicia-M-ROS2
git clone https://github.com/Synria-Robotics/Alicia-M-ROS2.git ./src
rosdep update
rosdep install --from-paths src --ignore-src -r -y
colcon build
source install/setup.bash
3. Quick Start
3.1 Set Serial Port Permissions
Method 1: Temporarily set serial port permissions
sudo chmod 666 /dev/ttyACM*
Method 2: Add the user to the dialout group (permanently effective)
sudo usermod -a -G dialout $USER
Note: You need to log out and log back in, or restart, for the permissions to take effect.
3.2 Start the Robotic Arm
- Single click: Switch motor mode (PV and MIT).
- Double click: The button light flashes rapidly and plays back the recorded motion; press any key during this time to stop playback.
- Long press: Within 1~2s, switch the gravity compensation mode. Note this is only valid in MIT mode.
- Extra-long press: More than 2s, the button light flashes slowly and records the motion during the button-light flashing period; press any key during this time to stop recording.
Before starting, first switch the robotic arm to PV mode, and use Ctrl+C to terminate any running nodes.
Choose one of the following three startup methods:
Method 1: Start Hardware + MoveIt (Recommended)
source install/setup.bash
ros2 launch alicia_m_bringup moveit_hardware.launch.py
Method 2: Start Hardware Control Alone
source install/setup.bash
ros2 launch alicia_m_bringup hardware.launch.py
Method 3: Start MoveIt Simulation Only
source install/setup.bash
ros2 launch alicia_m_bringup moveit_sim.launch.py
4. Hand-Eye Calibration
alicia_m_calibration provides the Alicia-M eye-in-hand hand-eye calibration and verification workflow, used to compute and verify the tool0 -> camera_link extrinsics.
The current calibration and verification launch files default to the Intel RealSense D405 topic configuration:
camera_topic:/camera/camera/color/image_rect_rawcamera_info_topic:/camera/camera/color/camera_info
If you use a different camera, override the corresponding topic parameters at launch.
alicia_m_calibration/
├── scripts/
│   ├── hand_eye_calibration.py      # Main hand-eye calibration script (Eye-in-Hand)
│   └── aruco_detector.py            # ArUco detection script
├── launch/
│   ├── hand_eye_calibration.launch.py
│   └── verify_calibration.launch.py
└── config/
	└── hand_eye_calibration_result.yaml
4.1 Environment Preparation
Before running calibration, ensure that the required environment is set up:
# Create a conda environment (if needed)
conda create -n calib python=3.11 -y
conda activate calib
conda install pip -y

# Install dependencies
pip install "numpy<2.0.0" "opencv-python<4.11" scipy pyyaml jinja2 typeguard
Unless explicitly specified, please try to exit conda before running the program:
conda deactivate
(Recommended) If needed, you can disable conda auto-start so that each new terminal does not automatically activate the conda environment:
conda config --set auto_activate_base false
4.2 Start the Necessary Nodes
Start in sequence in different terminals:
Terminal 1: Start the robotic arm + MoveIt
source install/setup.bash
ros2 launch alicia_m_bringup moveit_hardware.launch.py
Terminal 2: Start the camera driver (using the D405 as an example)
ros2 launch realsense2_camera rs_launch.py \
	enable_infra1:=true \
	enable_infra2:=true \
	infra_rgb:=true \
	pointcloud.enable:=true
4.3 Run Calibration
Place the ArUco marker flat in front of the robotic arm and ensure the image is clear and the lighting is stable.
Terminal 3: Start calibration
conda activate calib
source install/setup.bash
ros2 launch alicia_m_calibration hand_eye_calibration.launch.py
Example of common adjustable parameters:
ros2 launch alicia_m_calibration hand_eye_calibration.launch.py \
	marker_size:=0.05 \
	marker_id:=0 \
	min_samples:=15 \
	calibration_method:=daniilidis
Please wait patiently for calibration to finish. The calibration result is saved by default at:
src/alicia_m_calibration/config/hand_eye_calibration_result.yaml
4.4 Verify the Calibration Result
Terminal 3: Start the verification node
ros2 launch alicia_m_calibration verify_calibration.launch.py
Let the aruco appear in the camera's field of view, and keep the Terminal 3 program running, then open Terminal 4:
Terminal 4: Check the TF and result stability
Run the following command to view the TF tree:
ros2 run rqt_tf_tree rqt_tf_tree --force-discover
(Important) Run the following command to view the transform from the robotic arm's base_link to aruco_marker_frame, which can be verified with a ruler.
ros2 run tf2_ros tf2_echo base_link aruco_marker_frame
5. 2D Grasping (To Be Developed)
Stay tuned……
6. 6D Grasping
alicia_m_grasp_6d provides a D405-based 6D grasping workflow for the Alicia-M, with its core composed of the following modules:
d405_ros_bridge.py: ROS and perception environment bridge (system Python)d405_foundationstereo.py: Stereo depth estimation (FoundationStereo)d405_sam2.py: Interactive target segmentation (SAM2)d405_graspgen.py: Grasp pose generation (GraspGen + MeshCat)d405_execution.py: Grasp execution (MoveIt2)
The current project is implemented based on the Intel RealSense D405 depth camera. If you use a different camera, you need to modify the relevant code yourself.
Among them, d405_graspgen.py and d405_execution.py by default read:
alicia_m_calibration/config/hand_eye_calibration_result.yaml.
It is recommended to first complete the hand-eye calibration in Chapter 4 before running 6D grasping.
6.1 Source Installation and Environment Preparation
This subsection depends on and is adapted from the official project documentation: GraspGen FoundationStereo SAM2
The installation steps may change as the official repositories are updated, so it is strongly recommended to read them in conjunction with the official documentation.
If you encounter environment configuration problems, it is recommended to seek AI assistance.
6.1.1 GraspGen Installation
# Environment preparation
conda create -n GraspGen python=3.11 -y && conda activate GraspGen
pip install torch==2.1.0 torchvision==0.16.0 torch-cluster torch-scatter -f https://data.pyg.org/whl/torch-2.1.0+cu121.html
# Clone the repository and install
cd ~/Alicia-M-ROS2/src/alicia_m_grasp_6d/Models
git clone https://github.com/NVlabs/GraspGen.git
cd GraspGen && pip install -e .
# Install CUDA
conda install -c "nvidia/label/cuda-12.1.0" cuda-toolkit
# Install PointNet dependencies
./install_pointnet.sh
Download Checkpoints:
cd ~/Alicia-M-ROS2/src/alicia_m_grasp_6d/Models/GraspGen
git clone https://huggingface.co/adithyamurali/GraspGenModels
sudo apt update
sudo apt install git-lfs
git lfs install
cd GraspGenModels
git lfs pull
If you have not yet installed the NVIDIA graphics driver:
sudo apt update
sudo apt install nvidia-driver-535
# After installation, you must restart the computer for it to take effect
Install and start meshcat-server:
conda activate GraspGen
pip install meshcat
meshcat-server
Open a new terminal and run inference:
conda activate GraspGen
cd ~/Alicia-M-ROS2/src/alicia_m_grasp_6d/Models/GraspGen
python scripts/demo_object_pc.py --sample_data_dir GraspGenModels/sample_data/real_object_pc --gripper_config GraspGenModels/checkpoints/graspgen_robotiq_2f_140.yml
Open the output link in a browser. When the object point cloud and grasp poses can be successfully generated in the meshcat-server, the environment configuration of this module is successful.
6.1.2 FoundationStereo Installation
[FoundationStereo Official Documentation]
cd ~/Alicia-M-ROS2/src/alicia_m_grasp_6d/Models
git clone https://github.com/NVlabs/FoundationStereo.git
Environment preparation:
cd FoundationStereo
conda env create -f environment.yml
conda activate foundation_stereo
conda install -c "nvidia/label/cuda-12.1.0" cuda-toolkit
pip install flash-attn --no-build-isolation
Download the official weights and save them to the FoundationStereo/pretrained_models/ folder.
Run inference:
cd ~/Alicia-M-ROS2/src/alicia_m_grasp_6d/Models/FoundationStereo
python scripts/run_demo.py --left_file ./assets/left.png --right_file ./assets/right.png --ckpt_dir ./pretrained_models/11-33-40/model_best_bp2.pth --out_dir ./test_outputs/
If a point cloud image is generated and pops up, the environment configuration of this module is successful.
6.1.3 SAM2 Installation
In the alicia_m_grasp_6d/Models/ directory:
cd ~/Alicia-M-ROS2/src/alicia_m_grasp_6d/Models
conda create -n sam2 python=3.11 && conda activate sam2
git clone https://github.com/facebookresearch/sam2.git && cd sam2
pip install -e .
pip install -e ".[notebooks]"
Open sam2/checkpoints/download_ckpts.sh and uncomment the SAM 2 checkpoints section. You can comment out the SAM 2.1 checkpoints. Refer to the following:
#!/bin/bash

# Copyright (c) Meta Platforms, Inc. and affiliates.
# All rights reserved.

# This source code is licensed under the license found in the
# LICENSE file in the root directory of this source tree.

# Use either wget or curl to download the checkpoints
if command -v wget &> /dev/null; then
    CMD="wget"
elif command -v curl &> /dev/null; then
    CMD="curl -L -O"
else
    echo "Please install wget or curl to download the checkpoints."
    exit 1
fi

# Define the URLs for SAM 2 checkpoints
SAM2_BASE_URL="https://dl.fbaipublicfiles.com/segment_anything_2/072824"
sam2_hiera_t_url="${SAM2_BASE_URL}/sam2_hiera_tiny.pt"
sam2_hiera_s_url="${SAM2_BASE_URL}/sam2_hiera_small.pt"
sam2_hiera_b_plus_url="${SAM2_BASE_URL}/sam2_hiera_base_plus.pt"
sam2_hiera_l_url="${SAM2_BASE_URL}/sam2_hiera_large.pt"

# Download each of the four checkpoints using wget
echo "Downloading sam2_hiera_tiny.pt checkpoint..."
$CMD $sam2_hiera_t_url || { echo "Failed to download checkpoint from $sam2_hiera_t_url"; exit 1; }

echo "Downloading sam2_hiera_small.pt checkpoint..."
$CMD $sam2_hiera_s_url || { echo "Failed to download checkpoint from $sam2_hiera_s_url"; exit 1; }

echo "Downloading sam2_hiera_base_plus.pt checkpoint..."
$CMD $sam2_hiera_b_plus_url || { echo "Failed to download checkpoint from $sam2_hiera_b_plus_url"; exit 1; }

echo "Downloading sam2_hiera_large.pt checkpoint..."
$CMD $sam2_hiera_l_url || { echo "Failed to download checkpoint from $sam2_hiera_l_url"; exit 1; }

# Define the URLs for SAM 2.1 checkpoints
# SAM2p1_BASE_URL="https://dl.fbaipublicfiles.com/segment_anything_2/092824"
# sam2p1_hiera_t_url="${SAM2p1_BASE_URL}/sam2.1_hiera_tiny.pt"
# sam2p1_hiera_s_url="${SAM2p1_BASE_URL}/sam2.1_hiera_small.pt"
# sam2p1_hiera_b_plus_url="${SAM2p1_BASE_URL}/sam2.1_hiera_base_plus.pt"
# sam2p1_hiera_l_url="${SAM2p1_BASE_URL}/sam2.1_hiera_large.pt"

# SAM 2.1 checkpoints
# echo "Downloading sam2.1_hiera_tiny.pt checkpoint..."
# $CMD $sam2p1_hiera_t_url || { echo "Failed to download checkpoint from $sam2p1_hiera_t_url"; exit 1; }

# echo "Downloading sam2.1_hiera_small.pt checkpoint..."
# $CMD $sam2p1_hiera_s_url || { echo "Failed to download checkpoint from $sam2p1_hiera_s_url"; exit 1; }

# echo "Downloading sam2.1_hiera_base_plus.pt checkpoint..."
# $CMD $sam2p1_hiera_b_plus_url || { echo "Failed to download checkpoint from $sam2p1_hiera_b_plus_url"; exit 1; }

# echo "Downloading sam2.1_hiera_large.pt checkpoint..."
# $CMD $sam2p1_hiera_l_url || { echo "Failed to download checkpoint from $sam2p1_hiera_l_url"; exit 1; }

echo "All checkpoints are downloaded successfully."
Download the official weights:
cd checkpoints && \
./download_ckpts.sh && \
cd ..
6.2 Run the 6D Grasping Module
- Start the robotic arm and the camera.
- Start the ROS bridge node.
- Start the grasp execution node (the robotic arm will first return to the observation position).
- Start MeshCat.
- Start FoundationStereo and SAM2.
- After selecting a target in the SAM2 window, start GraspGen to generate grasp poses.
- In the execution node terminal, choose whether to execute the grasp (
y/n/q).
6.2.1 Start the Robotic Arm and the Camera
source install/setup.bash
ros2 launch alicia_m_bringup moveit_hardware.launch.py
ros2 launch realsense2_camera rs_launch.py \
	enable_infra1:=true \
	enable_infra2:=true \
	infra_rgb:=true \
	pointcloud.enable:=true
6.2.2 Start the ROS Bridge Node (System Python)
cd ~/Alicia-M-ROS2/src/alicia_m_grasp_6d/scripts
python3 d405_ros_bridge.py
6.2.3 Start the Grasp Execution Node (System Python)
cd ~/Alicia-M-ROS2/src/alicia_m_grasp_6d/scripts
python3 d405_execution.py --min_z 0.0
This node is responsible for listening to the grasp pose topic and calling MoveIt to execute the grasp action.
After starting this node, the robotic arm will open the gripper and move to the preset observation position, waiting for grasp poses. When the GraspGen node generates a grasp pose, the current grasp pose will be highlighted in red in MeshCat, and the terminal will prompt the user whether to execute the current grasp.
Interactive Operations:
y: Execute the current graspn: Skip and view the next oneq: Exit
Please wait for the robotic arm to move to the observation position before starting the subsequent nodes.
6.2.4 Start MeshCat (GraspGen Environment)
conda activate GraspGen
meshcat-server
6.2.5 Start FoundationStereo (foundation_stereo Environment)
conda activate foundation_stereo
cd ~/Alicia-M-ROS2/src/alicia_m_grasp_6d/scripts
python d405_foundationstereo.py --visualize
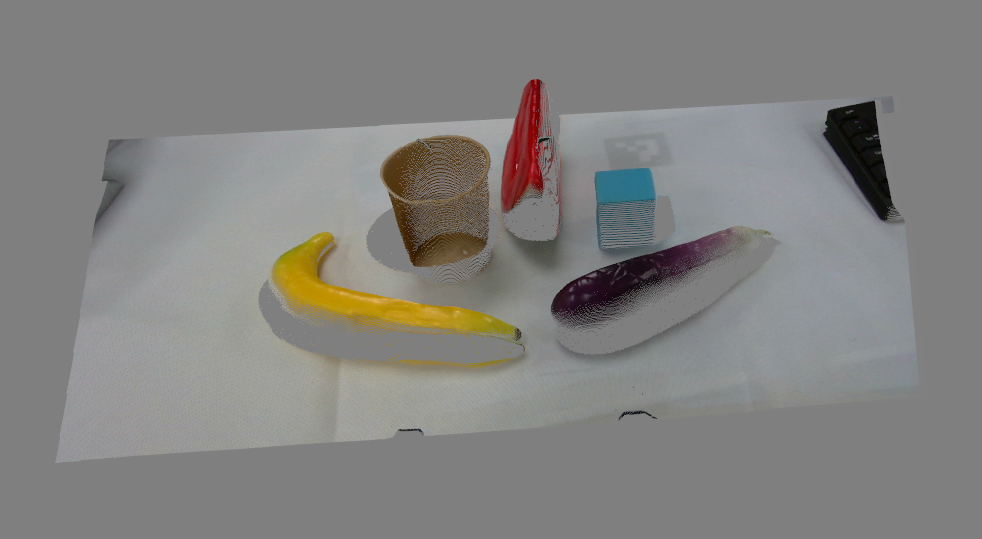
q to exit the image, after which the point cloud topic can be published.Parameters:
--visualize: Display the depth map (only displayed after the first inference; press q to exit)--ckpt_dir: Model weights path--scale: Image scaling ratio--z_far: Maximum depth--denoise_cloud: Enable point cloud denoising (enabled by default)
6.2.6 Start SAM2 (sam2 Environment)
conda activate sam2
cd ~/Alicia-M-ROS2/src/alicia_m_grasp_6d/scripts
python d405_sam2.py --model large
Parameters:
--model: Model size [tiny/small/base/large] (default large)--bridge_port: ZeroMQ port
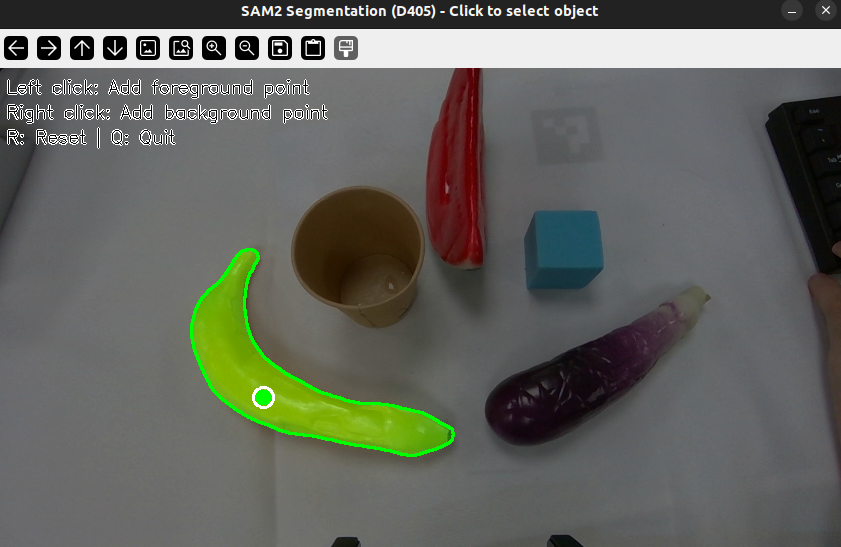
Interactive Operations:
- Left-click: Add a positive sample point (target region)
- Right-click: Add a negative sample point (background region)
rkey: Resetq: Exit
6.2.7 Start GraspGen (GraspGen Environment)
conda activate GraspGen
cd ~/Alicia-M-ROS2/src/alicia_m_grasp_6d/scripts
python d405_graspgen.py
This node subscribes to the point cloud and mask topics, uses the GraspGen model to generate grasp poses, and publishes them to the grasp execution node. You can view the generated grasp poses in the meshcat-server interface, where the current grasp pose is highlighted in red. You can choose whether to execute the current grasp in the terminal running the grasp execution node.
After the robotic arm completes the grasp and returns to the observation position, you can reset in the SAM2 window and select a new target object, then press Enter in the GraspGen terminal. At this point, GraspGen will generate a new grasp pose based on the new point cloud and mask.
Parameters:
--gripper_config: Gripper configuration file--grasp_threshold: Confidence threshold (default 0.8)--num_grasps: Number of grasps to generate (default 200)--topk_num_grasps: Return top-k grasps (default 100)
In the meshcat-server, the block point cloud is in the robotic arm base coordinate frame and has been centered.
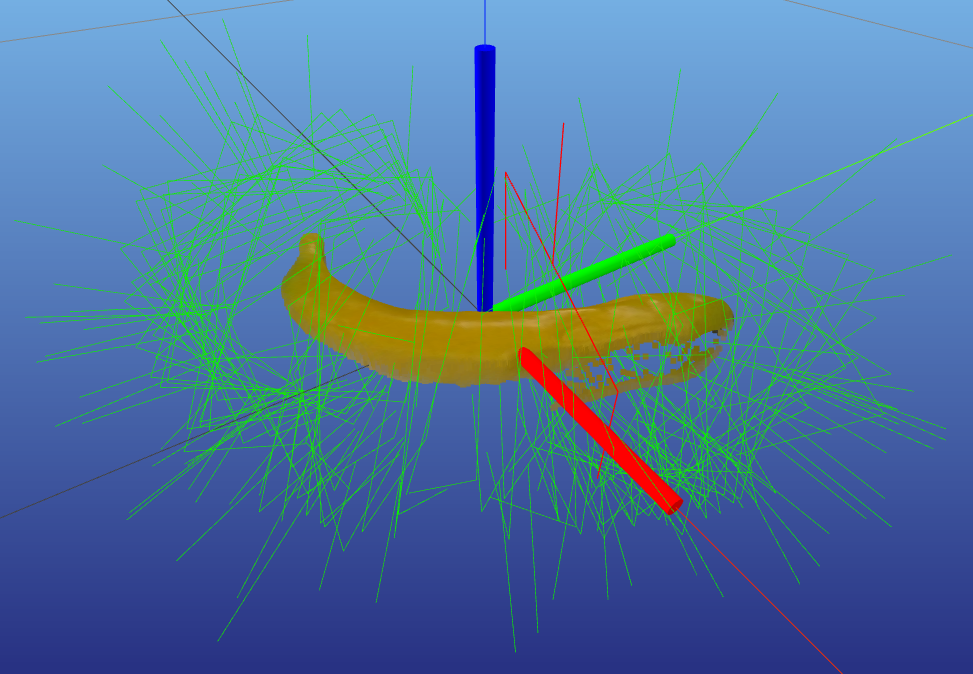
If a large number of candidate grasps in the execution node have IK failures, you can appropriately adjust the grasp parameters of d405_execution.py (such as GRIPPER_DEPTH, PRE_GRASP_DISTANCE, z_min) or improve the calibration quality before retrying.
If you find that vertically downward grasp poses are very few or not generated in meshcat (when the target object in the physical world can be reasonably grasped by having the gripper point vertically downward), try reducing z_min or GRIPPER_DEPTH.