云擎操作臂ROS2 Humble
1. 介绍
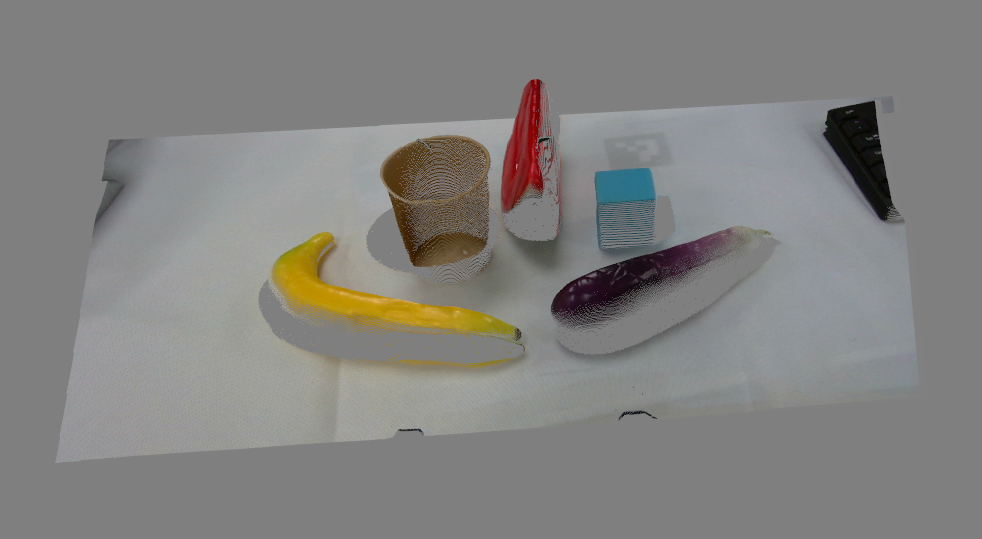
Alicia-M ROS2 是用于控制云擎 Alicia-M 系列机械臂的 ROS 2 工作区。项目基于 ROS 2 Humble,提供从底层驱动到上层规划的完整控制链路,覆盖硬件启动、MoveIt 运动规划、模型可视化、手眼标定与物块抓取等核心能力。
![]()
1.1 主要特性
- ros2_control 驱动集成:基于串口通信实现机械臂硬件控制。
- MoveIt2 支持:支持运动规划与执行。
- RViz 可视化:支持机械臂模型显示与交互可视化。
- 手眼标定:支持眼在手上标定流程(适配 Intel RealSense D405)及标定结果验证。
- 示例脚本:提供 Python 示例(如 Pick and Place)。
- 项目实践:2D 物块分拣(待开发)与基于 GraspGen(Nvidia, 2025)的 6D 抓取工作流。
1.2 项目结构
src/
├── alicia_m_bringup/          # 机械臂硬件与 MoveIt 启动入口
├── alicia_m_calibration/      # 手眼标定与验证脚本
├── alicia_m_descriptions/     # URDF、mesh、RViz 显示配置
├── alicia_m_driver/           # ros2_control 硬件驱动(串口通信)
├── alicia_m_grasp_6d/         # 6D 抓取模块(待开发)
├── alicia_m_moveit_config/    # MoveIt2 配置与控制器配置
└── examples/                  # MoveIt 示例脚本
2. 安装与编译
2.1 环境要求
- Ubuntu 22.04
- ROS2 Humble
2.2 获取源代码并编译
mkdir -p ~/Alicia-M-ROS2/src
cd ~/Alicia-M-ROS2
git clone https://github.com/Synria-Robotics/Alicia-M-ROS2.git ./src
rosdep update
rosdep install --from-paths src --ignore-src -r -y
colcon build
source install/setup.bash
3. 快速开始
3.1 设置串口权限
方法1:临时设置串口权限
sudo chmod 666 /dev/ttyACM*
方法2:添加用户到dialout组(永久有效)
sudo usermod -a -G dialout $USER
注意:需要注销(Log out)再登陆,或者重启使权限生效。
3.2 启动机械臂
- 单击:切换电机模式( PV 和 MIT )。
- 双击:按键灯快速闪烁,回放记录的动作,期间任意键停止回放
- 长按:1~2s内,切换重力补偿模式。注意只有mit模式下有效
- 超长按:2s以上,按键灯慢闪烁,记录按键灯闪烁期间的动作,期间任意键停止记录
启动前请先将机械臂切换为 PV 模式,并使用 Ctrl+C 终止正在运行的节点。
以下三种启动方式选择一种即可:
方式一:启动硬件 + MoveIt(推荐)
source install/setup.bash
ros2 launch alicia_m_bringup moveit_hardware.launch.py
方式二:单独启动硬件控制
source install/setup.bash
ros2 launch alicia_m_bringup hardware.launch.py
方式三:仅启动 MoveIt 仿真
source install/setup.bash
ros2 launch alicia_m_bringup moveit_sim.launch.py
4. 手眼标定
alicia_m_calibration 提供 Alicia-M 的眼在手上(Eye-in-Hand)手眼标定与验证流程,用于计算并验证 tool0 -> camera_link 的外参。
当前标定与验证 launch 默认按 Intel RealSense D405 话题配置:
camera_topic:/camera/camera/color/image_rect_rawcamera_info_topic:/camera/camera/color/camera_info
如使用其他相机,请在启动时覆盖对应 topic 参数。
alicia_m_calibration/
├── scripts/
│   ├── hand_eye_calibration.py      # 手眼标定主脚本(Eye-in-Hand)
│   └── aruco_detector.py            # ArUco 检测脚本
├── launch/
│   ├── hand_eye_calibration.launch.py
│   └── verify_calibration.launch.py
└── config/
	└── hand_eye_calibration_result.yaml
4.1 环境准备
在运行标定前,确保需要的环境已经设置:
# 创建 conda 环境(如果需要)
conda create -n calib python=3.11 -y
conda activate calib
conda install pip -y

# 安装依赖
pip install "numpy<2.0.0" "opencv-python<4.11" scipy pyyaml jinja2 typeguard
若非明确指定,请尽量确保退出 conda 再运行程序:
conda deactivate
(推荐)如有需要,可禁用 conda 自启动,这样每次启动新终端不会自动启用 conda 环境:
conda config --set auto_activate_base false
4.2 启动必要节点
在不同终端依次启动:
终端 1:启动机械臂 + MoveIt
source install/setup.bash
ros2 launch alicia_m_bringup moveit_hardware.launch.py
终端 2:启动相机驱动(以 D405 为例)
ros2 launch realsense2_camera rs_launch.py \
	enable_infra1:=true \
	enable_infra2:=true \
	infra_rgb:=true \
	pointcloud.enable:=true
4.3 运行标定
请将 ArUco 码平放在机械臂前方并保证画面清晰、光照稳定。
终端 3:启动标定
conda activate calib
source install/setup.bash
ros2 launch alicia_m_calibration hand_eye_calibration.launch.py
常用可调参数示例:
ros2 launch alicia_m_calibration hand_eye_calibration.launch.py \
	marker_size:=0.05 \
	marker_id:=0 \
	min_samples:=15 \
	calibration_method:=daniilidis
请耐心等待标定结束,标定结果默认保存在:
src/alicia_m_calibration/config/hand_eye_calibration_result.yaml
4.4 验证标定结果
终端 3:启动验证节点
ros2 launch alicia_m_calibration verify_calibration.launch.py
让 aruco 出现在相机视野内,并保持 终端 3 程序运行,然后开启 终端 4:
终端 4:检查 TF 与结果稳定性
运行以下命令查看TF tree:
ros2 run rqt_tf_tree rqt_tf_tree --force-discover
(重要)运行以下命令查看机械臂 base_link 到 aruco_marker_frame 的变换,可用刻度尺验证。
ros2 run tf2_ros tf2_echo base_link aruco_marker_frame
5. 2D抓取(待开发)
敬请期待……
6. 6D抓取
alicia_m_grasp_6d 为 Alicia-M 提供基于 D405 的 6D 抓取流程,核心由以下模块组成:
d405_ros_bridge.py:ROS 与感知环境桥接(系统 Python)d405_foundationstereo.py:双目深度估计(FoundationStereo)d405_sam2.py:交互式目标分割(SAM2)d405_graspgen.py:抓取位姿生成(GraspGen + MeshCat)d405_execution.py:抓取执行(MoveIt2)
当前项目基于 Intel RealSense D405 深度相机实现。若使用其它相机,需自行修改相关代码。
其中 d405_graspgen.py 与 d405_execution.py 默认会读取:
alicia_m_calibration/config/hand_eye_calibration_result.yaml。
建议先完成第 4 章手眼标定再运行 6D 抓取。
6.1 源码安装与环境准备
6.1.1 GraspGen 安装
# 环境准备
conda create -n GraspGen python=3.11 -y && conda activate GraspGen
pip install torch==2.1.0 torchvision==0.16.0 torch-cluster torch-scatter -f https://data.pyg.org/whl/torch-2.1.0+cu121.html
# 克隆仓库并安装
cd ~/Alicia-M-ROS2/src/alicia_m_grasp_6d/Models
git clone https://github.com/NVlabs/GraspGen.git
cd GraspGen && pip install -e .
# 安装CUDA
conda install -c "nvidia/label/cuda-12.1.0" cuda-toolkit
# 安装 PointNet 依赖
./install_pointnet.sh
下载Checkpoints:
cd ~/Alicia-M-ROS2/src/alicia_m_grasp_6d/Models/GraspGen
git clone https://huggingface.co/adithyamurali/GraspGenModels
sudo apt update
sudo apt install git-lfs
git lfs install
cd GraspGenModels
git lfs pull
如果您尚未安装NVDIA显卡驱动:
sudo apt update
sudo apt install nvidia-driver-535
# 安装后必须重启电脑才能生效
安装和启动 meshcat-server:
conda activate GraspGen
pip install meshcat
meshcat-server
新建终端,运行推理:
conda activate GraspGen
cd ~/Alicia-M-ROS2/src/alicia_m_grasp_6d/Models/GraspGen
python scripts/demo_object_pc.py --sample_data_dir GraspGenModels/sample_data/real_object_pc --gripper_config GraspGenModels/checkpoints/graspgen_robotiq_2f_140.yml
在浏览器中打开输出的链接,当 meshcat-server 中能够成功生成物体点云和抓取位姿,则该模块环境配置成功。
6.1.2 FoundationStereo 安装
cd ~/Alicia-M-ROS2/src/alicia_m_grasp_6d/Models
git clone https://github.com/NVlabs/FoundationStereo.git
环境准备:
cd FoundationStereo
conda env create -f environment.yml
conda activate foundation_stereo
conda install -c "nvidia/label/cuda-12.1.0" cuda-toolkit
pip install flash-attn --no-build-isolation
下载官方权重并保存到 FoundationStereo/pretrained_models/ 文件夹下。
运行推理:
cd ~/Alicia-M-ROS2/src/alicia_m_grasp_6d/Models/FoundationStereo
python scripts/run_demo.py --left_file ./assets/left.png --right_file ./assets/right.png --ckpt_dir ./pretrained_models/11-33-40/model_best_bp2.pth --out_dir ./test_outputs/
若生成并弹出点云图,则该模块环境配置成功。
6.1.3 SAM2 安装
在 alicia_m_grasp_6d/Models/ 目录下:
cd ~/Alicia-M-ROS2/src/alicia_m_grasp_6d/Models
conda create -n sam2 python=3.11 && conda activate sam2
git clone https://github.com/facebookresearch/sam2.git && cd sam2
pip install -e .
pip install -e ".[notebooks]"
打开 sam2/checkpoints/download_ckpts.sh ,将SAM 2 checkpoints的部分取消注释。可注释掉SAM 2.1 checkpoints。参考如下:
#!/bin/bash

# Copyright (c) Meta Platforms, Inc. and affiliates.
# All rights reserved.

# This source code is licensed under the license found in the
# LICENSE file in the root directory of this source tree.

# Use either wget or curl to download the checkpoints
if command -v wget &> /dev/null; then
    CMD="wget"
elif command -v curl &> /dev/null; then
    CMD="curl -L -O"
else
    echo "Please install wget or curl to download the checkpoints."
    exit 1
fi

# Define the URLs for SAM 2 checkpoints
SAM2_BASE_URL="https://dl.fbaipublicfiles.com/segment_anything_2/072824"
sam2_hiera_t_url="${SAM2_BASE_URL}/sam2_hiera_tiny.pt"
sam2_hiera_s_url="${SAM2_BASE_URL}/sam2_hiera_small.pt"
sam2_hiera_b_plus_url="${SAM2_BASE_URL}/sam2_hiera_base_plus.pt"
sam2_hiera_l_url="${SAM2_BASE_URL}/sam2_hiera_large.pt"

# Download each of the four checkpoints using wget
echo "Downloading sam2_hiera_tiny.pt checkpoint..."
$CMD $sam2_hiera_t_url || { echo "Failed to download checkpoint from $sam2_hiera_t_url"; exit 1; }

echo "Downloading sam2_hiera_small.pt checkpoint..."
$CMD $sam2_hiera_s_url || { echo "Failed to download checkpoint from $sam2_hiera_s_url"; exit 1; }

echo "Downloading sam2_hiera_base_plus.pt checkpoint..."
$CMD $sam2_hiera_b_plus_url || { echo "Failed to download checkpoint from $sam2_hiera_b_plus_url"; exit 1; }

echo "Downloading sam2_hiera_large.pt checkpoint..."
$CMD $sam2_hiera_l_url || { echo "Failed to download checkpoint from $sam2_hiera_l_url"; exit 1; }

# Define the URLs for SAM 2.1 checkpoints
# SAM2p1_BASE_URL="https://dl.fbaipublicfiles.com/segment_anything_2/092824"
# sam2p1_hiera_t_url="${SAM2p1_BASE_URL}/sam2.1_hiera_tiny.pt"
# sam2p1_hiera_s_url="${SAM2p1_BASE_URL}/sam2.1_hiera_small.pt"
# sam2p1_hiera_b_plus_url="${SAM2p1_BASE_URL}/sam2.1_hiera_base_plus.pt"
# sam2p1_hiera_l_url="${SAM2p1_BASE_URL}/sam2.1_hiera_large.pt"

# SAM 2.1 checkpoints
# echo "Downloading sam2.1_hiera_tiny.pt checkpoint..."
# $CMD $sam2p1_hiera_t_url || { echo "Failed to download checkpoint from $sam2p1_hiera_t_url"; exit 1; }

# echo "Downloading sam2.1_hiera_small.pt checkpoint..."
# $CMD $sam2p1_hiera_s_url || { echo "Failed to download checkpoint from $sam2p1_hiera_s_url"; exit 1; }

# echo "Downloading sam2.1_hiera_base_plus.pt checkpoint..."
# $CMD $sam2p1_hiera_b_plus_url || { echo "Failed to download checkpoint from $sam2p1_hiera_b_plus_url"; exit 1; }

# echo "Downloading sam2.1_hiera_large.pt checkpoint..."
# $CMD $sam2p1_hiera_l_url || { echo "Failed to download checkpoint from $sam2p1_hiera_l_url"; exit 1; }

echo "All checkpoints are downloaded successfully."
下载官方权重:
cd checkpoints && \
./download_ckpts.sh && \
cd ..
6.2 运行6D抓取模块
- 启动机械臂和相机。
- 启动 ROS 桥接节点。
- 启动抓取执行节点(机械臂会先回观察位)。
- 启动 MeshCat。
- 启动 FoundationStereo 与 SAM2。
- 在 SAM2 窗口选择目标后,启动 GraspGen 生成抓取位姿。
- 在执行节点终端中选择是否执行抓取(
y/n/q)。
6.2.1 启动机械臂与相机
source install/setup.bash
ros2 launch alicia_m_bringup moveit_hardware.launch.py
ros2 launch realsense2_camera rs_launch.py \
	enable_infra1:=true \
	enable_infra2:=true \
	infra_rgb:=true \
	pointcloud.enable:=true
6.2.2 启动 ROS 桥接节点(系统 Python)
cd ~/Alicia-M-ROS2/src/alicia_m_grasp_6d/scripts
python3 d405_ros_bridge.py
6.2.3 启动抓取执行节点(系统 Python)
cd ~/Alicia-M-ROS2/src/alicia_m_grasp_6d/scripts
python3 d405_execution.py --min_z 0.0
该节点负责监听抓取位姿话题,并调用 MoveIt 执行抓取动作。
启动该节点后,机械臂会张开夹爪,并移动到预设的观察位置,等待抓取位姿。当GraspGen节点生成抓取位姿后,当前抓取位姿会在 MeshCat 中红色高亮显示,终端会提示用户是否执行当前抓取。
交互操作:
y:执行当前抓取n:跳过,查看下一个q:退出
请等待机械臂移动到观察位置后,再启动后续节点。
6.2.4 启动 MeshCat(GraspGen 环境)
conda activate GraspGen
meshcat-server
6.2.5 启动 FoundationStereo(foundation_stereo 环境)
conda activate foundation_stereo
cd ~/Alicia-M-ROS2/src/alicia_m_grasp_6d/scripts
python d405_foundationstereo.py --visualize
q 退出图片,方可发布点云话题。参数:
--visualize: 显示深度图(仅在第一次推理后显示,按q退出)--ckpt_dir: 模型权重路径--scale: 图像缩放比例--z_far: 最大深度--denoise_cloud: 启用点云去噪(默认开启)
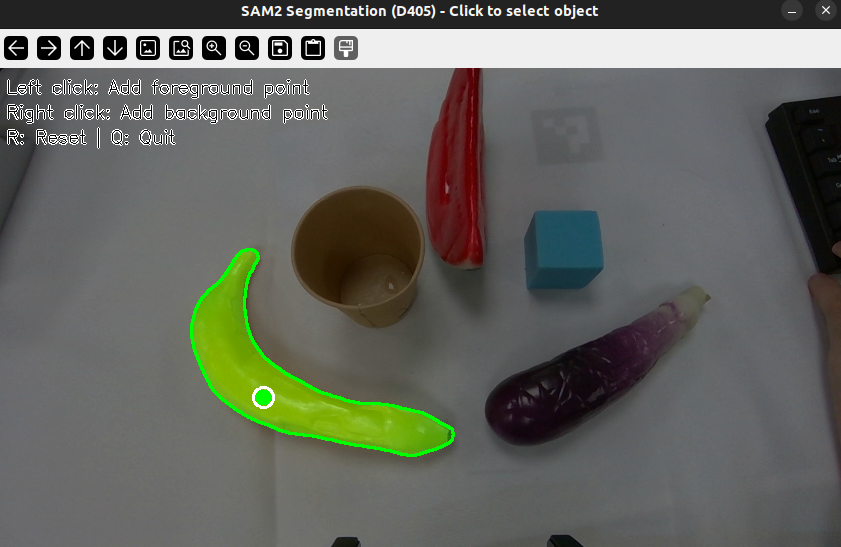
6.2.6 启动 SAM2(sam2 环境)
conda activate sam2
cd ~/Alicia-M-ROS2/src/alicia_m_grasp_6d/scripts
python d405_sam2.py --model large
参数:
--model: 模型大小 [tiny/small/base/large](默认 large)--bridge_port: ZeroMQ 端口
交互操作:
- 左键点击:添加正样本点(目标区域)
- 右键点击:添加负样本点(背景区域)
r键:重置q:退出
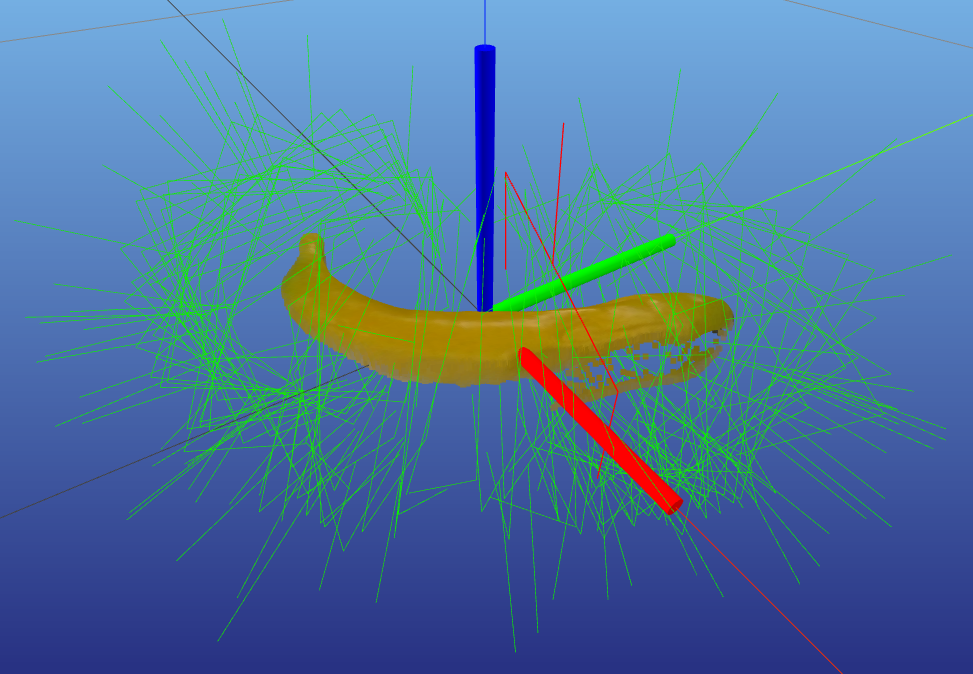
6.2.7 启动 GraspGen(GraspGen 环境)
conda activate GraspGen
cd ~/Alicia-M-ROS2/src/alicia_m_grasp_6d/scripts
python d405_graspgen.py
该节点订阅点云和掩码话题,使用 GraspGen 模型生成抓取位姿,并发布到抓取执行节点。您可以在 meshcat-server 界面中查看生成的抓取位姿,当前的抓取位姿会以红色高亮显示。您可以在运行抓取执行节点的终端中选择是否执行当前抓取。
当机械臂完成抓取并回到观察位置后,可在SAM2窗口重置并选择新的目标物体,然后在GraspGen终端中按 Enter,此时GraspGen将基于新的点云和掩码生成新的抓取位姿。
参数:
--gripper_config: 夹爪配置文件--grasp_threshold: 置信度阈值(默认 0.8)--num_grasps: 生成抓取数量(默认 200)--topk_num_grasps: 返回 top-k 抓取(默认 100)
meshcat-server 中,物块点云在机械臂基座坐标系下,并做了居中处理。
若执行节点中大量候选抓取出现 IK 失败,可适当调整 d405_execution.py 的抓取参数(如 GRIPPER_DEPTH、PRE_GRASP_DISTANCE、z_min)或提高标定质量后重试。
若发现 meshcat 中竖直向下的抓取位姿极少或未生成(当物理世界中目标物体可以通过让夹爪竖直向下实现合理的抓取时),请尝试减小 z_min 或 GRIPPER_DEPTH 。