Installation and Usage Guide
1. Interface and Button Descriptions
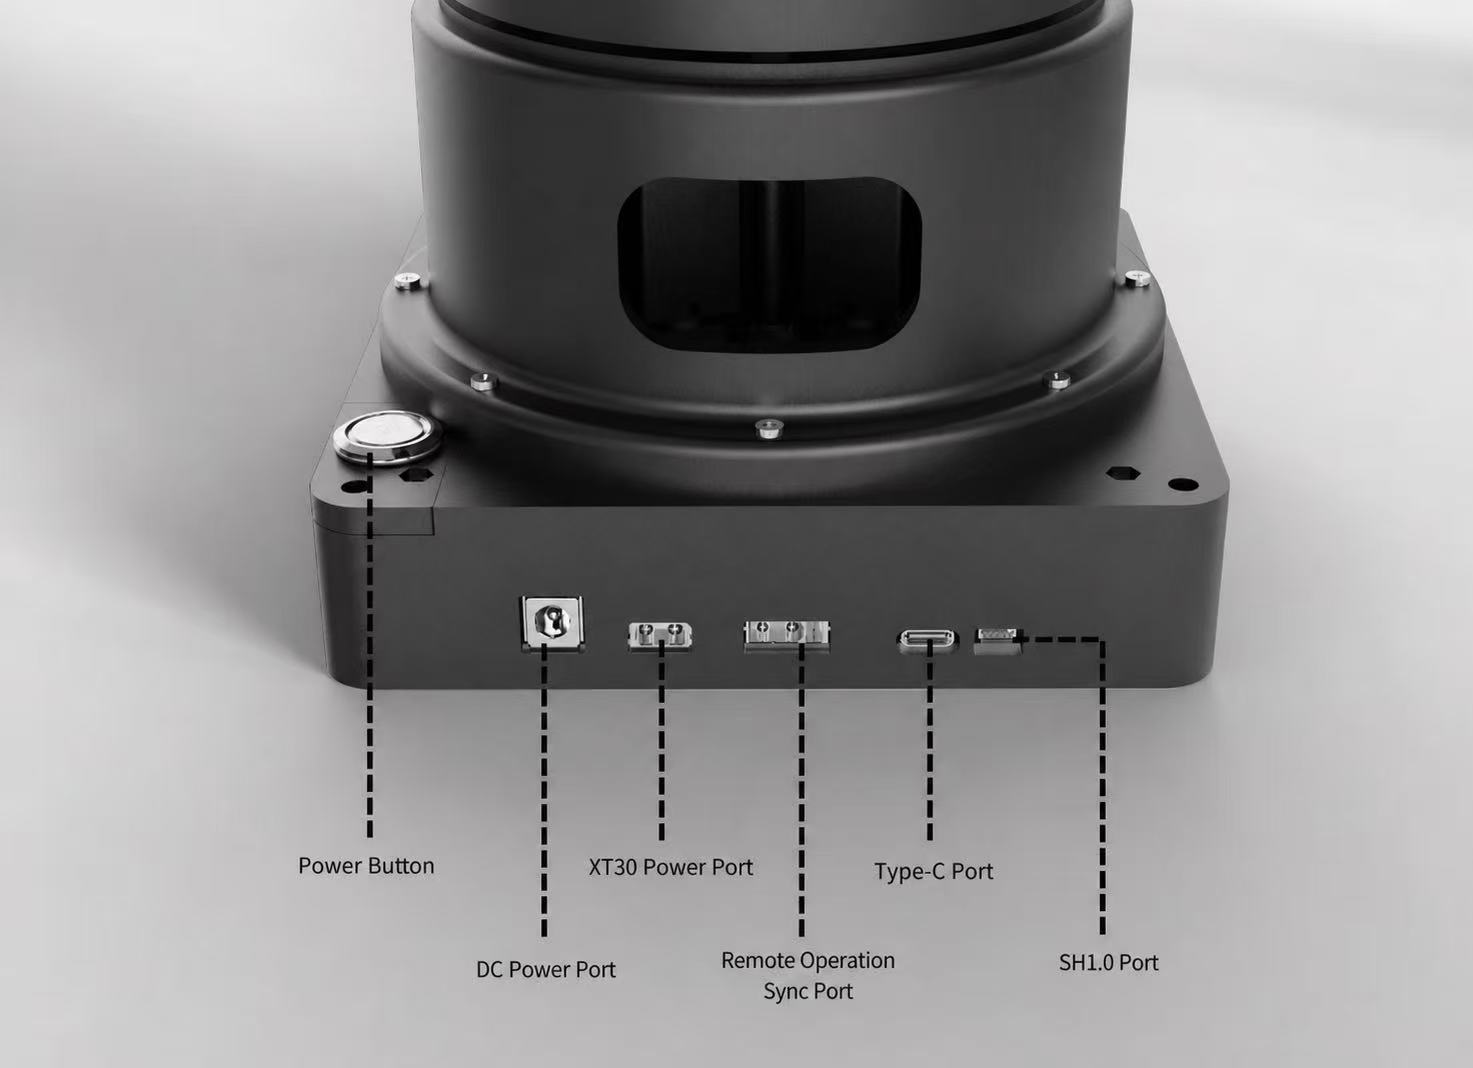
The figure below shows the descriptions of the interfaces on the follower arm's base plate:
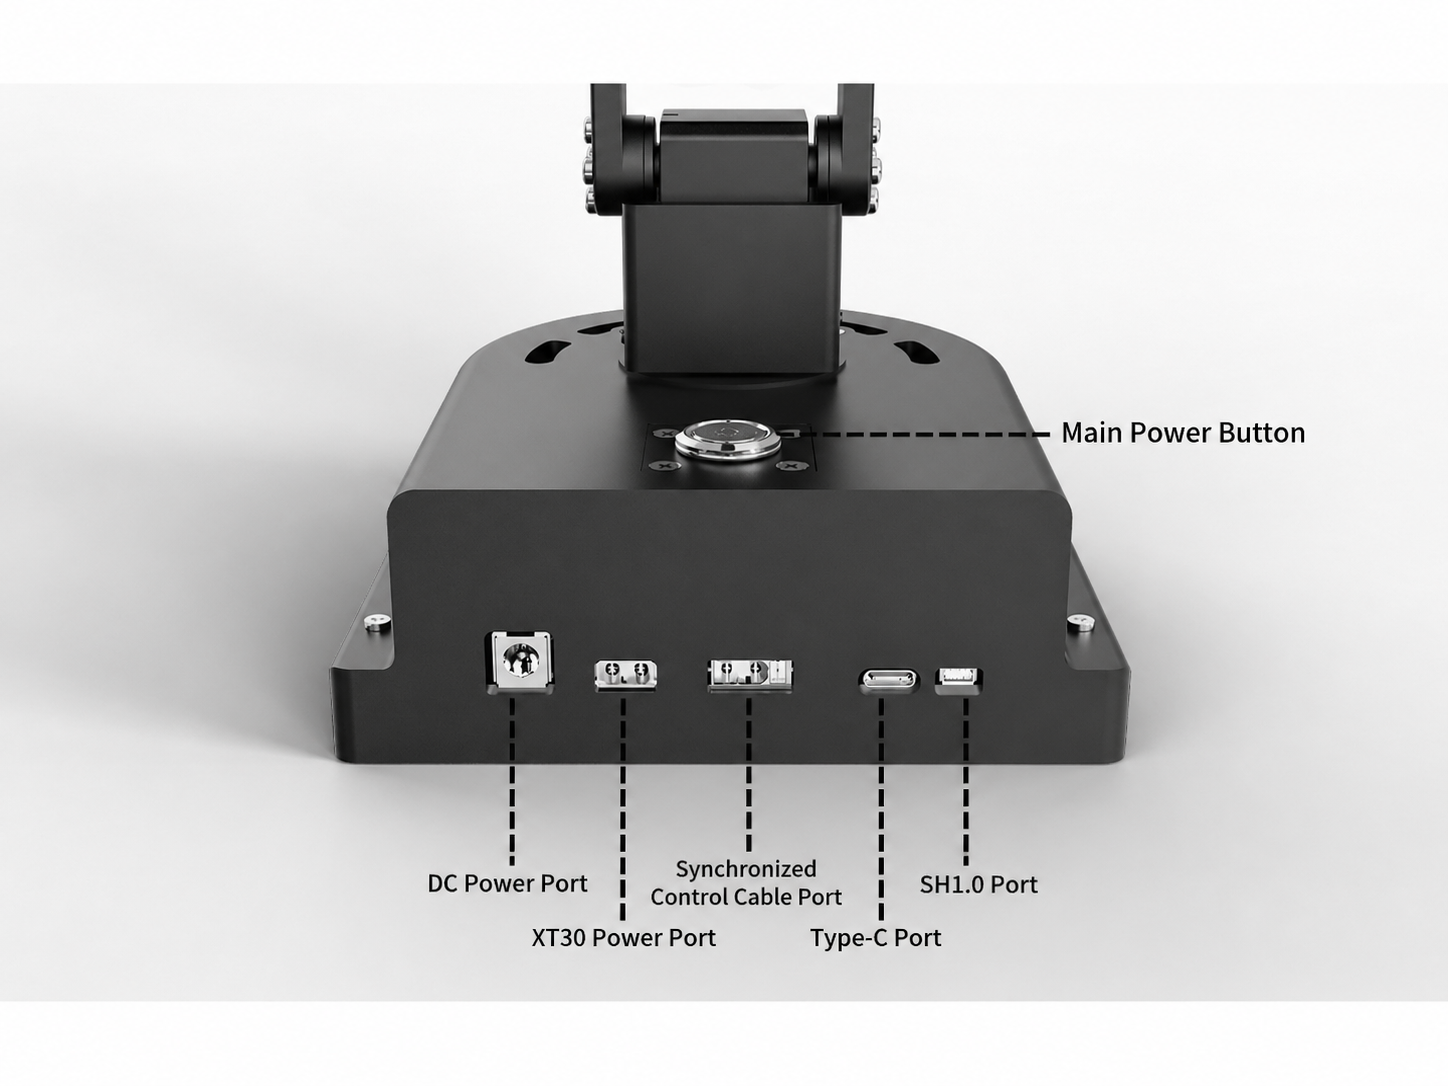
The figure below shows the descriptions of the interfaces on the leader arm's base plate:
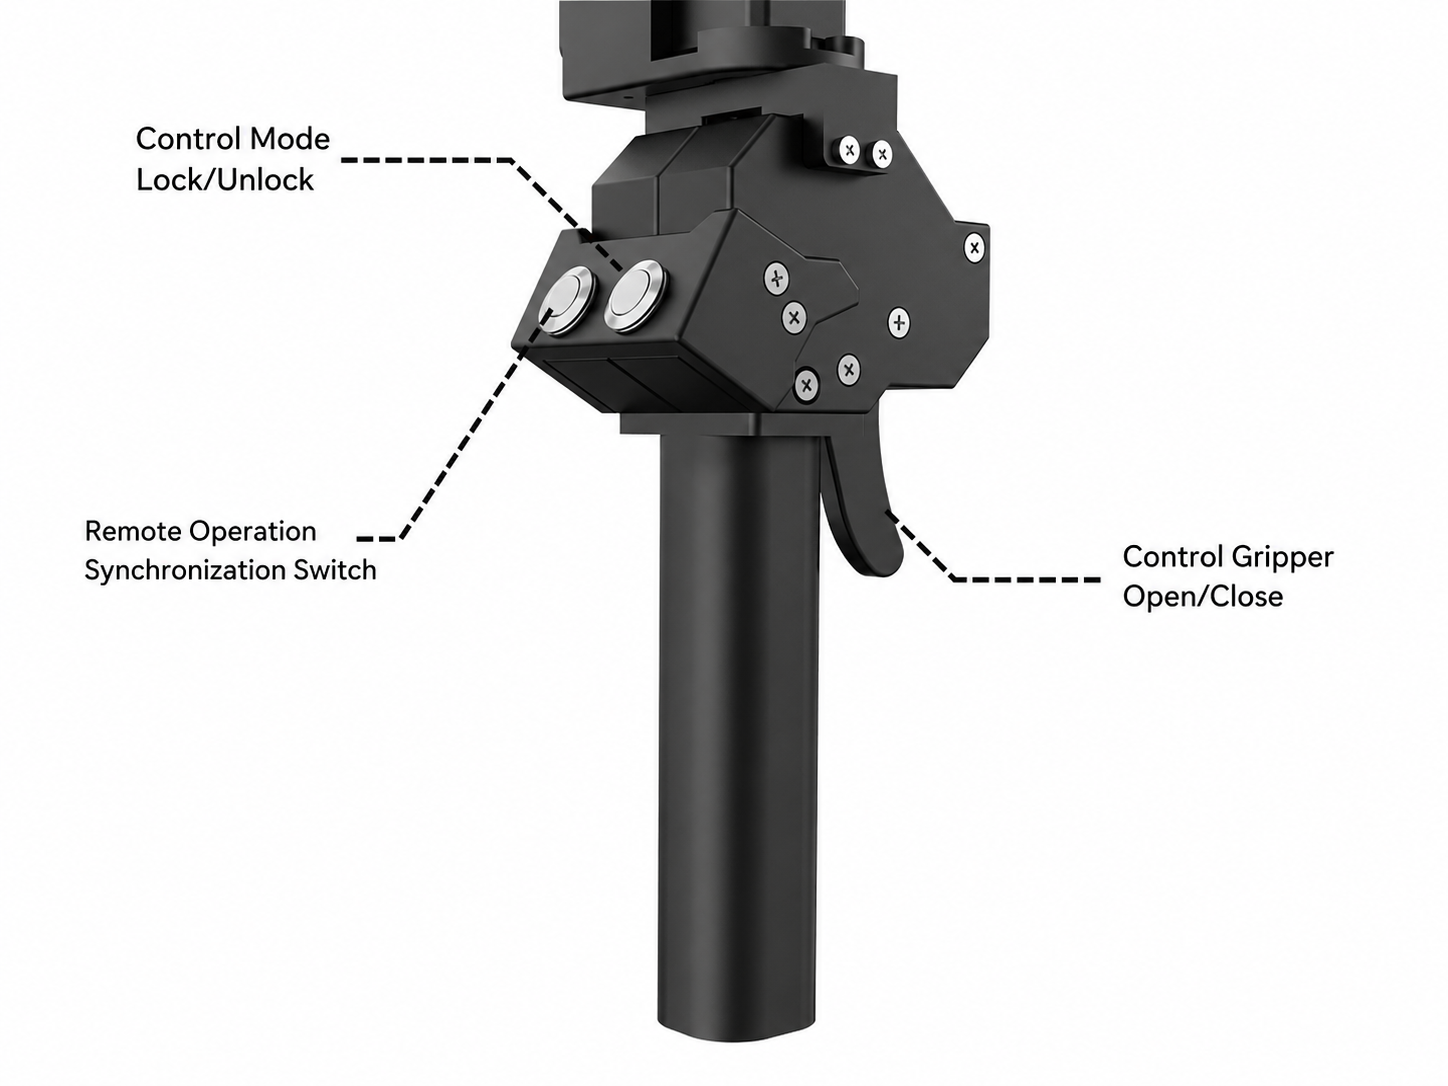
The figure below shows the buttons on the leader arm's grip, which include:
-
Teleoperation sync switch button: Used to control the teleoperation connection state between the leader arm and the follower arm. When enabled, the leader arm can synchronously control the follower arm's motion in real time; when disabled, the teleoperation function is disconnected and the leader arm can no longer control the follower arm;
-
Pose lock/unlock button: Used to toggle the free-movement state of the leader arm. When unlocked, the leader arm is in a de-energized (torque-off) state and can be manually guided by the operator; when locked, the leader arm's pose is fixed and cannot be moved freely;
-
Gripper open/close trigger: Pressing this trigger controls the opening and closing of the gripper at the follower arm's end-effector, enabling grasping or releasing operations.
2. Follower Arm Unboxing and Assembly Tutorial
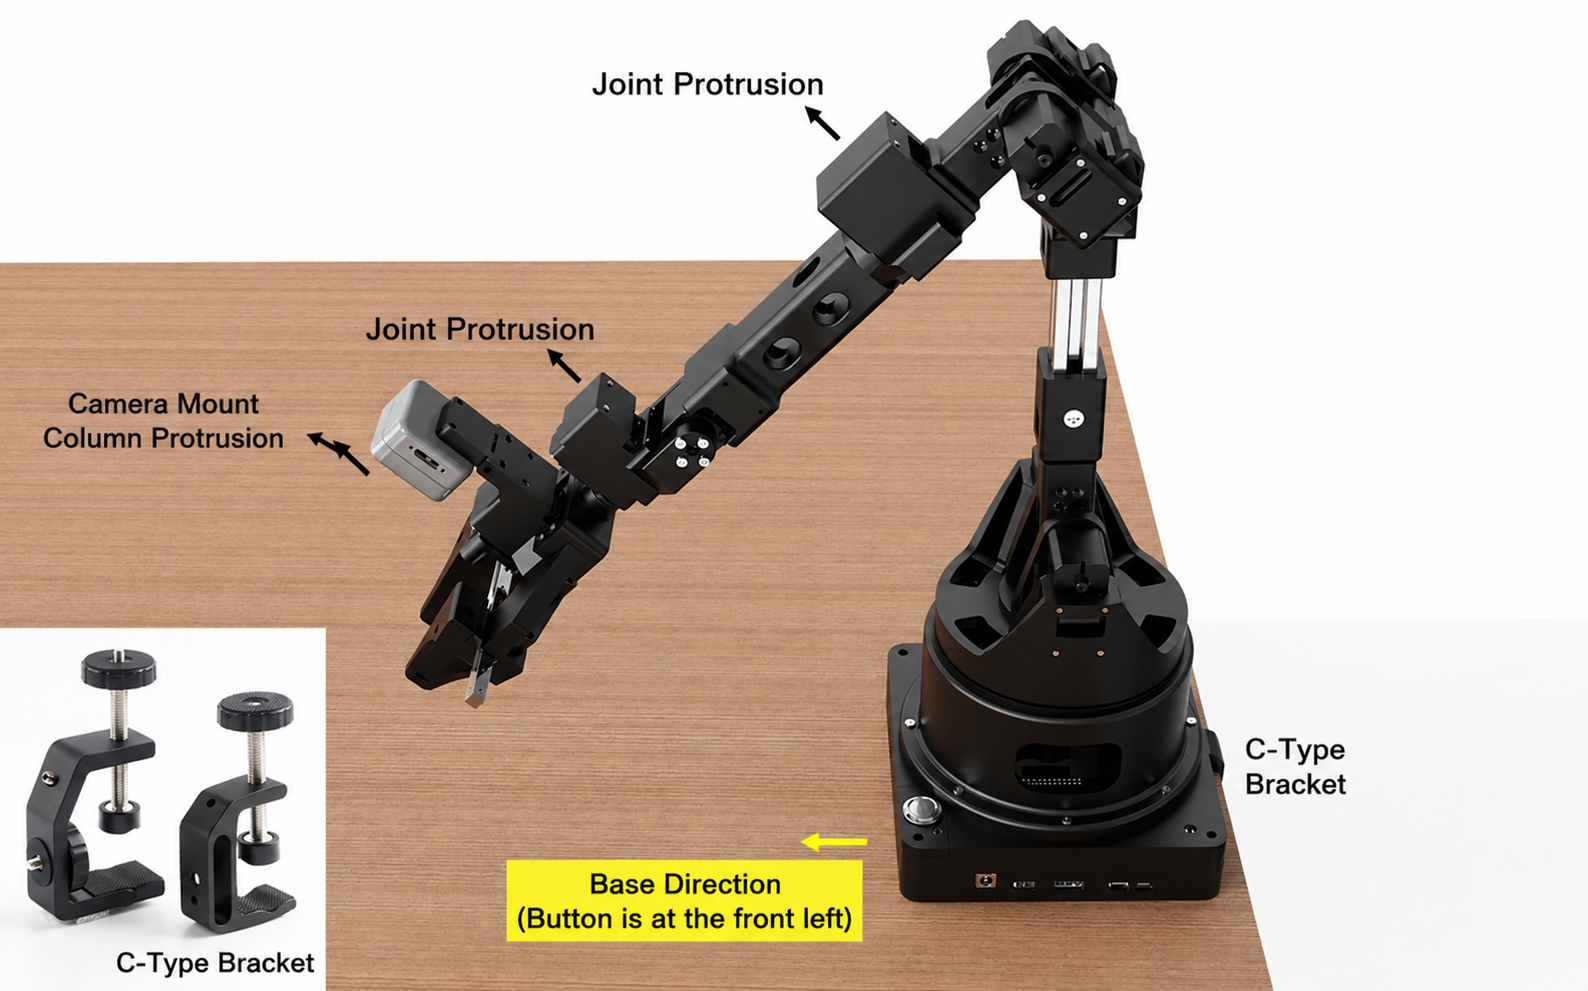
Keep the follower arm in its operating posture and use the C-shaped bracket to fix it to the edge of the desk, ready for use.
-
Before each use, the follower arm must be adjusted to the operating posture in standby; it is strictly forbidden to power on the device in any other posture, to prevent injury to personnel or damage to the product;
-
The user can use the orientation of the two joint protrusions and the one camera-post protrusion, as well as the direction of the base, as auxiliary judgment: in the operating posture, the joint protrusions and the camera-post protrusion should point diagonally upward, with the power button at the front-left, ensuring the arm has been correctly homed.
3. Leader Arm Unboxing and Assembly Tutorial
After taking out the leader arm, lay it flat on the desk, adjust it to the operating posture shown in the figure below, fix it with the C-shaped bracket, and keep it in standby.
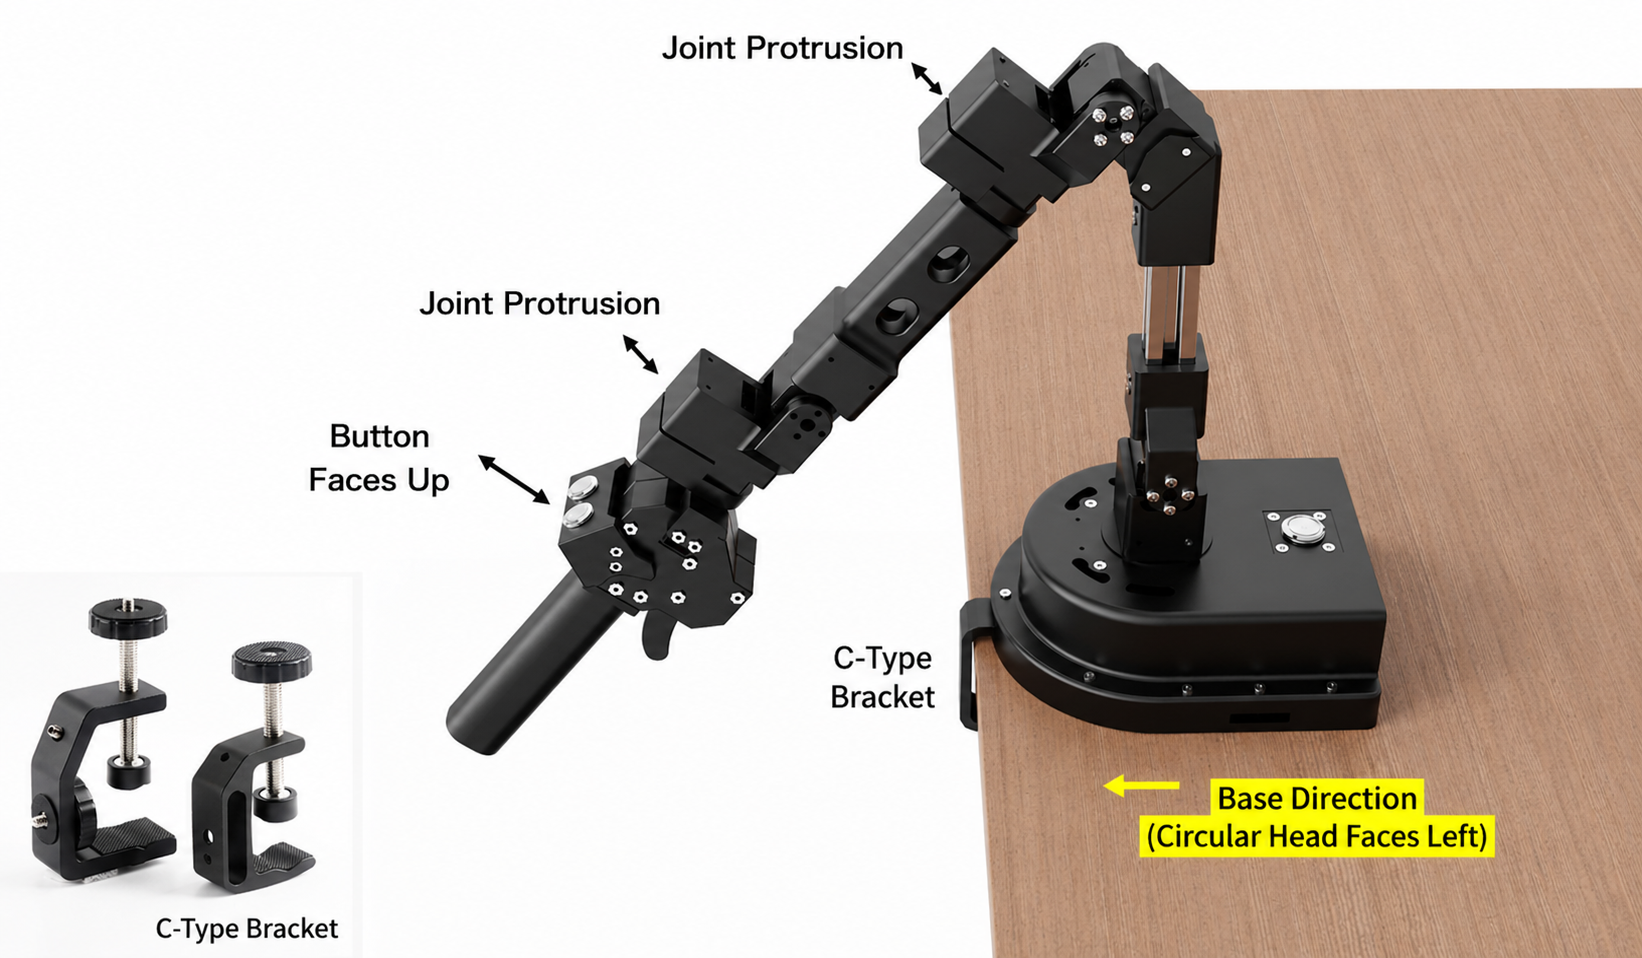
-
Before each use, the leader arm must be adjusted to the operating posture in standby; it is strictly forbidden to power on the device in any other posture, to prevent injury to personnel or damage to the product;
-
The user can use the protrusion direction of the two joints and the orientation of the grip button as auxiliary judgment: in the operating posture, the joint protrusions and the grip button should both point diagonally upward, with the rounded end of the base facing left, to ensure the arm has been correctly homed.
4. Wiring Method for the Follower Arm and Leader Arm
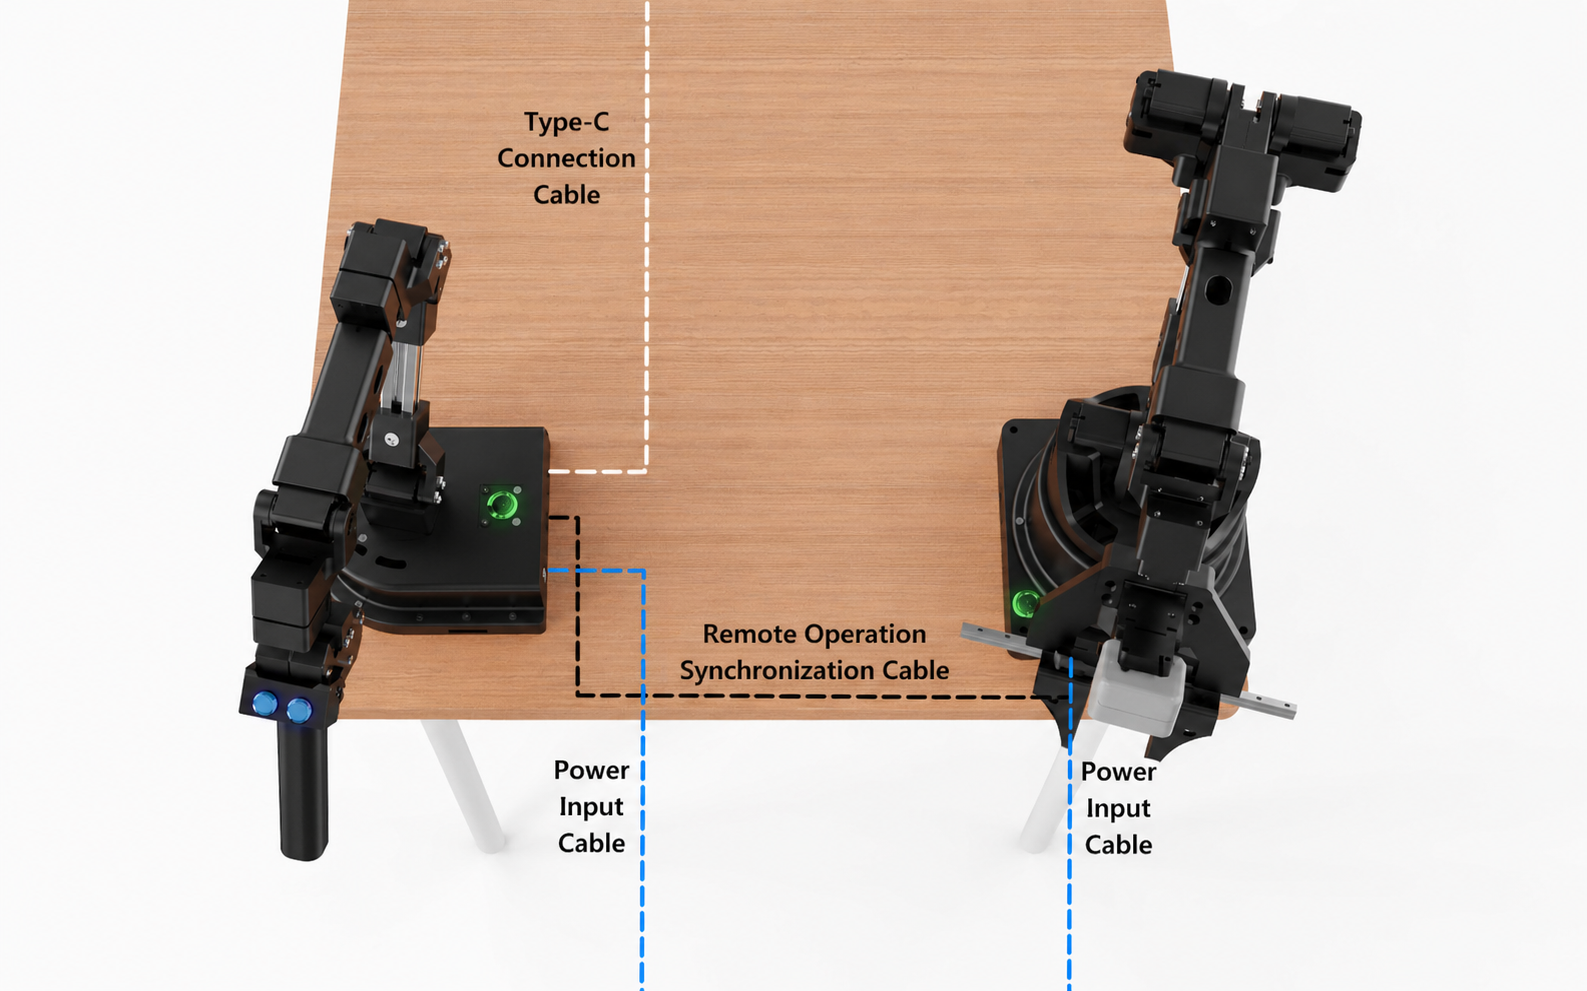
(1) Leader Arm – Follower Arm Connection Method
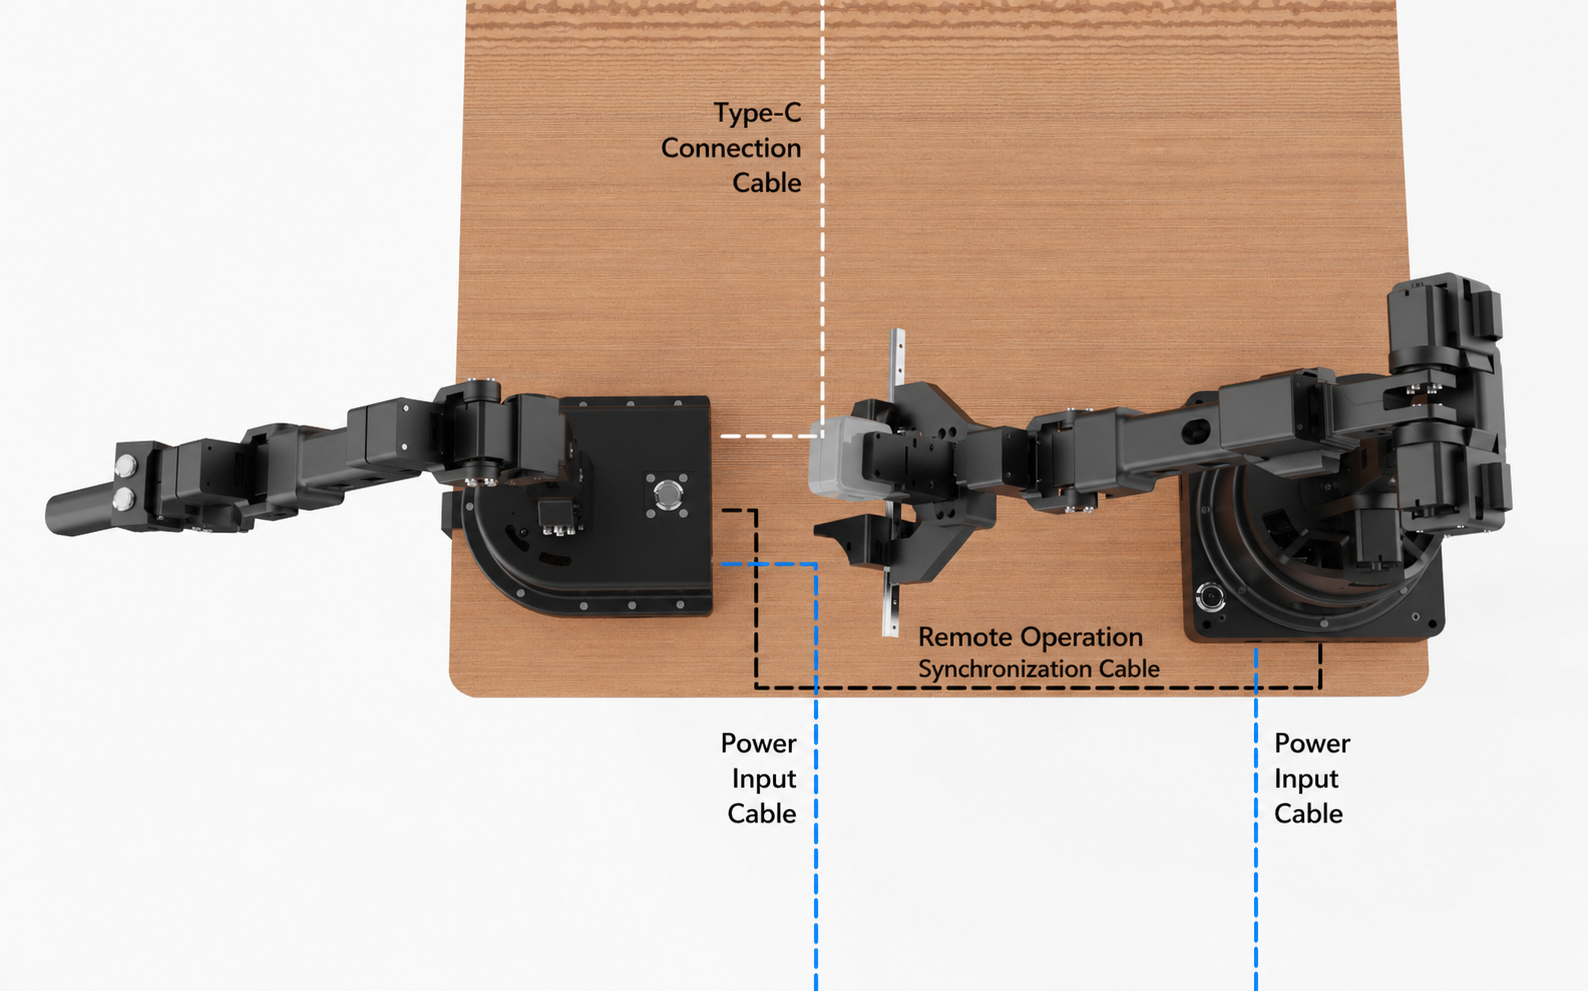
(2) Leader Arm – Computer Wiring Diagram
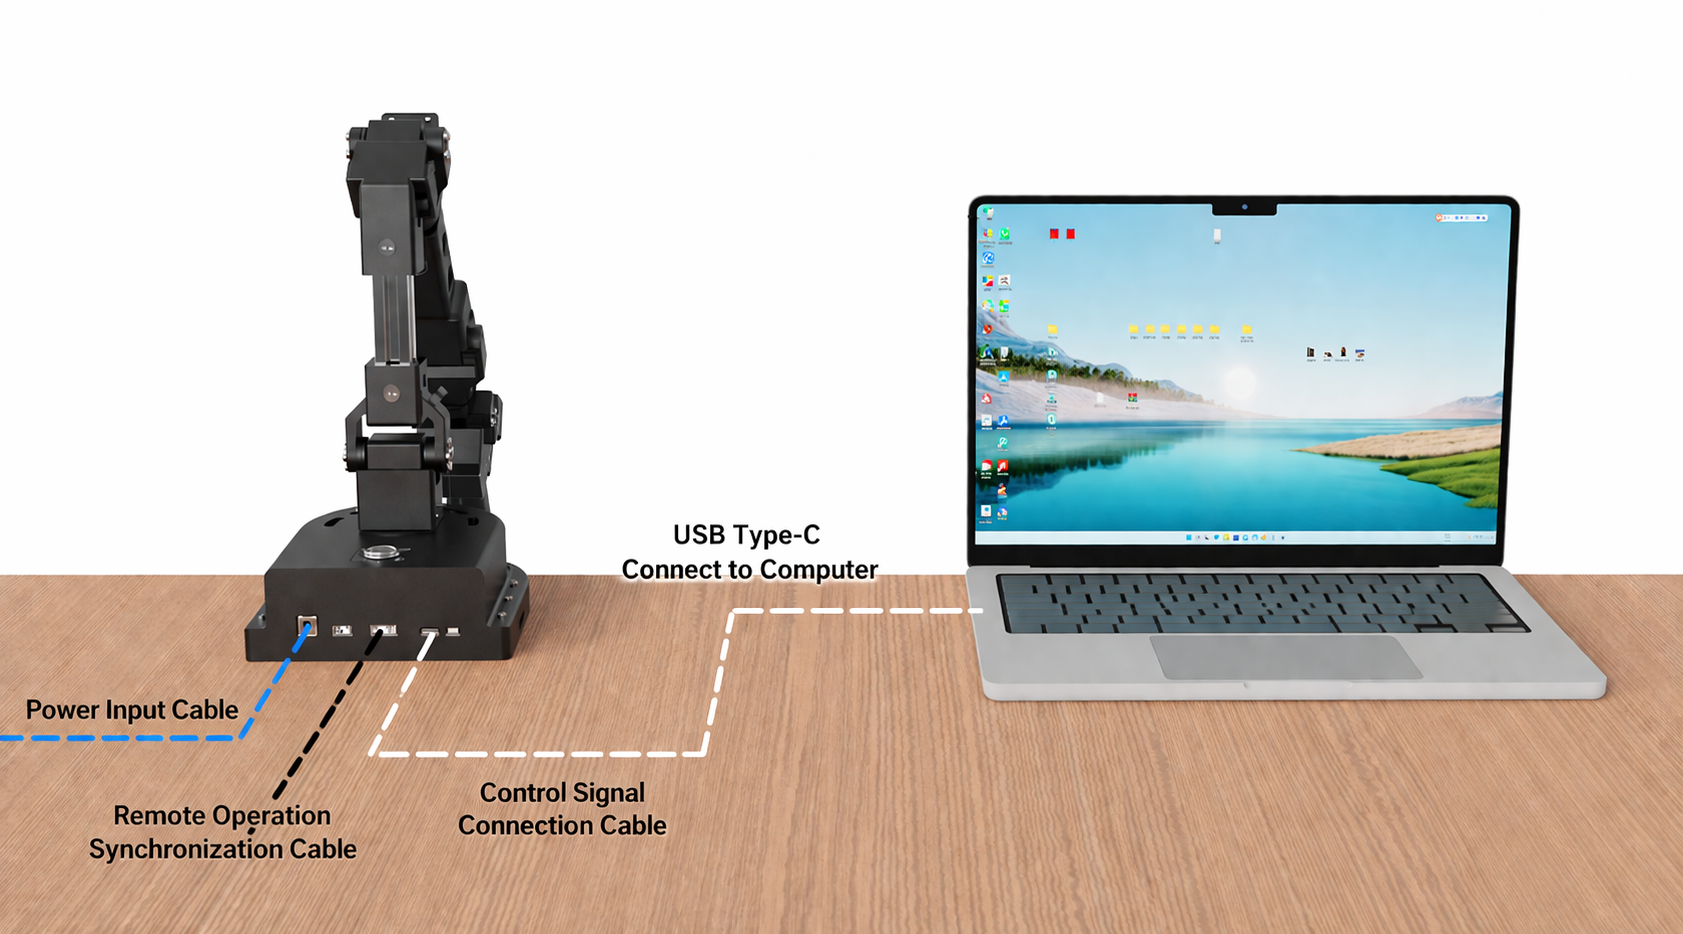
Follower Arm Connection Method
- Connect the power cable to the follower arm's DC power interface;
Leader Arm Connection Method
-
Connect the power cable to the leader arm's DC power interface;
-
Use a USB-to-Type-C data cable to connect the leader arm's Type-C interface to the computer's USB interface;
Follower Arm – Leader Arm Interconnection Method
- Use the teleoperation sync cable to connect the follower arm to the leader arm.
5. Dual-Arm Teleoperation Usage Method
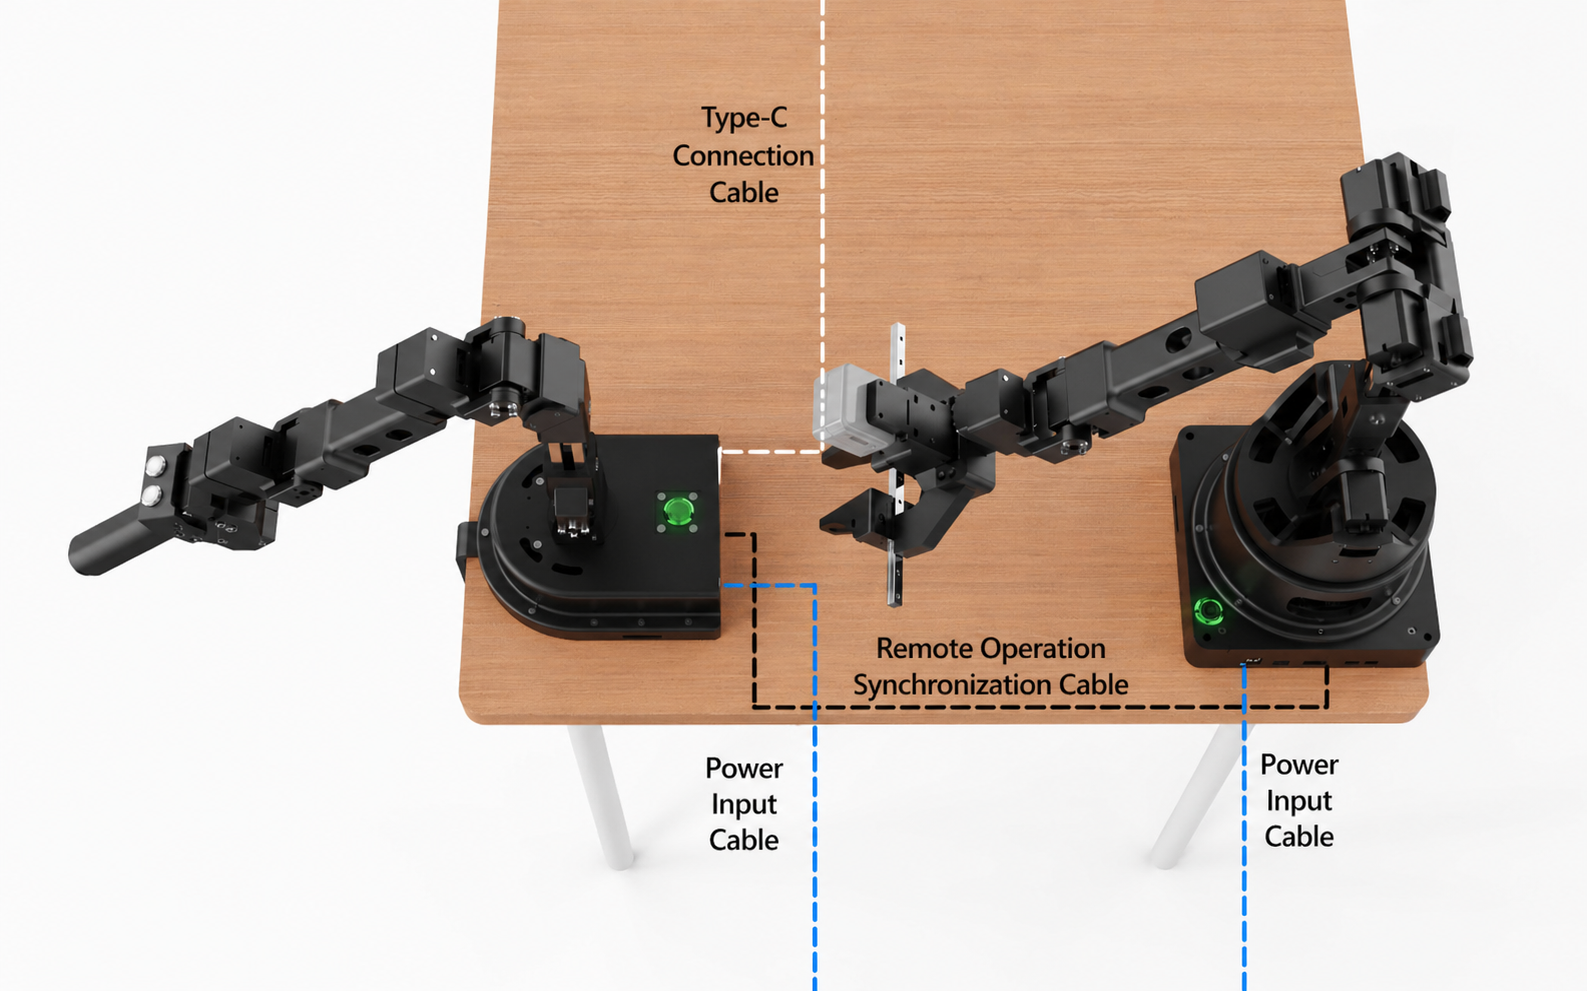
(1) Press the Main Power Switch of the Leader Arm and Follower Arm
In dual-arm connection mode, press the power buttons of the leader arm and the follower arm in sequence to start the system.
(2) Press the Leader Arm's Sync Button (the left button when held) to Achieve Teleoperation Sync Between the Two Arms
During sync operation, hold the grip and move slowly and steadily to synchronize the poses of the leader arm and the follower arm; after adjusting to the target pose, press the button on the right side of the grip to lock the leader arm's position.
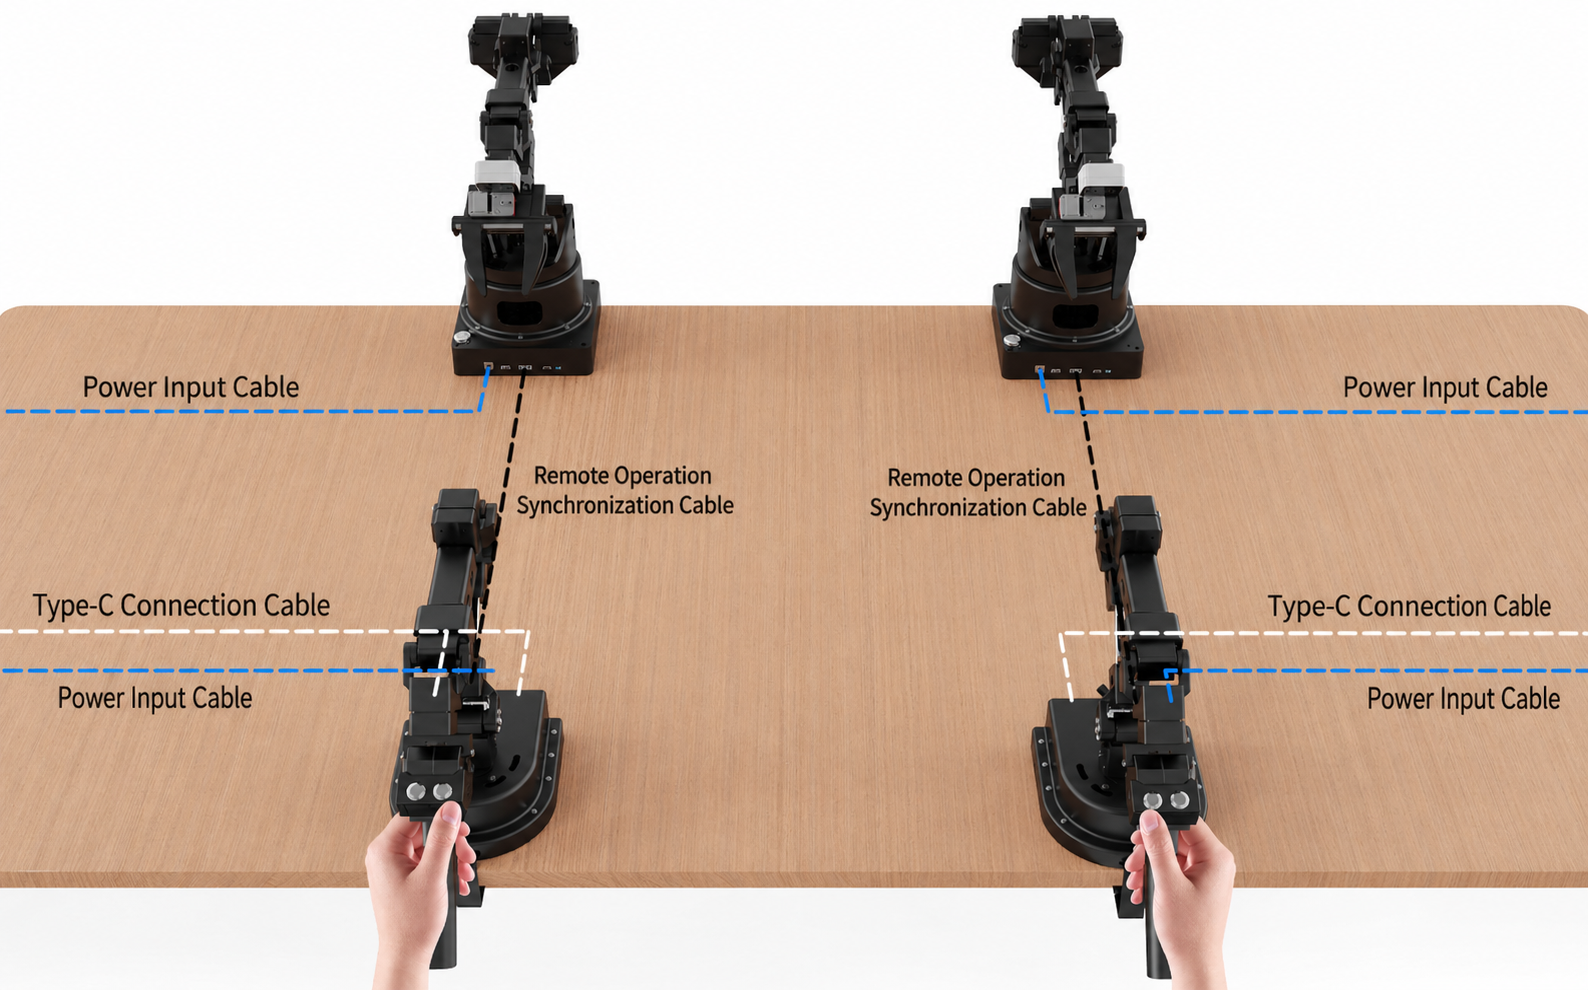
(3) Left- and Right-Hand Teleoperation Sync Example (for reference by users who purchased the quad-arm kit)
(4) Teleoperation Precautions
-
Confirm whether each joint axis of the robotic arm is in the zero position;
-
Check that all cable connections are secure and that the insulation sheathing is intact and undamaged;
-
Before operating the robotic arm, wear the necessary safety protective equipment according to the actual working environment and operational needs;
-
It is strictly forbidden to modify the robotic arm without authorization; the company is not responsible for any malfunction or accident caused by unauthorized modification;
-
Before positioning the robotic arm, be sure to confirm that there are no personnel or obstacles within its range of motion, to prevent collisions or other safety incidents;
-
It is strictly forbidden to use this product in harsh environments, including but not limited to dusty, high-temperature, direct-sunlight, flammable/explosive, highly corrosive, or underwater locations.
-
During operation, keep the speed low and the motion steady to ensure the safety and controllability of the equipment;
-
Stay focused during operation and anticipate the direction and trend of the robotic arm's motion in advance;
-
Regularly check the operating status of the robotic arm and watch for any abnormal motion or noise;
-
All control commands must ensure that the robotic arm's range of motion stays within the safe working zone; if it goes out of bounds, immediately stop the operation and cut off the power to prevent injury to personnel or damage to the equipment;
-
It is strictly forbidden to cut off power arbitrarily while the robotic arm is running, to avoid system failure or unexpected risks;
-
After the operation is complete, be sure to return the robotic arm to a safe position;
-
Turn off the power buttons of the follower arm and the leader arm in sequence; during this process, please support the robotic arm to ensure it remains steady during power-off, preventing mechanical shock or damage;
-
Unplug the power plug and properly organize the cables;
-
Store the robotic arm in a dry, room-temperature environment, avoiding damage to the equipment from moisture, high temperature, and other factors.