Alicia Imitation Learning System Overview
LeRobot provides a unified framework covering the complete lifecycle of robot learning, with functionality spanning four stages: data collection, model training, algorithm validation, and deployment, helping researchers and developers efficiently achieve closed-loop development from perception to control. Below is an imitation-learning example for the Alicia teleoperation kit based on LeRobot.
1. Installation and Environment Preparation
1.1 Create the Python Environment
conda create -n lerobot python=3.10 -y
conda activate lerobot
1.2 Install Dependencies
git clone https://github.com/Synria-Robotics/lerobot.git -b v6.1.0
cd lerobot
pip install -e .
Verify the installation:
lerobot-record --help
lerobot-train --help
The above commands only need to be run once.
2 Single Teleoperation Kit: Cube Grasping
Equipment/items used:
- Alicia D teleoperation kit;
- One C10 Synria camera;
- One D405 RealSense camera;
- A 2.5 cm × 2.5 cm cube;
- A storage box;
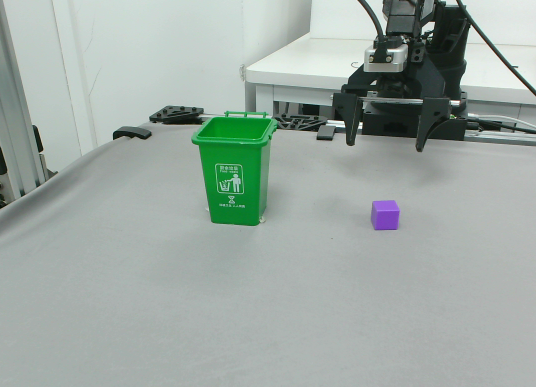
Place the cube and the storage box within the follower arm's workspace, mount the D405 on the wrist bracket of the robotic arm, and adjust the C10 front camera angle as shown in the figure below:
2.1 Hardware Connection
2.1.1 Connecting Only the Leader Arm
- Connect the D405 wrist camera (wrist) and the C10 front camera (front) to the computer
- Connect the leader arm's data cable to the computer
- Connect the teleoperation sync cable between the leader arm and the follower arm
In this mode, both the follower arm's current state (Observation) and the given action (Action) are obtained through the leader arm's data cable, with a one-fps interval between them.
2.1.2 Obtaining Leader-Arm and Follower-Arm Data Separately
- Connect the D405 wrist camera (wrist) and the C10 front camera (front) to the computer
- Connect both the leader arm's and the follower arm's data cables to the computer
- Connect the teleoperation sync cable between the leader arm and the follower arm (optional)
In this mode, the follower arm's current state (Observation) and the given action (Action) are obtained from the follower arm's data cable and the leader arm's data cable, respectively.
2.2 Data Collection
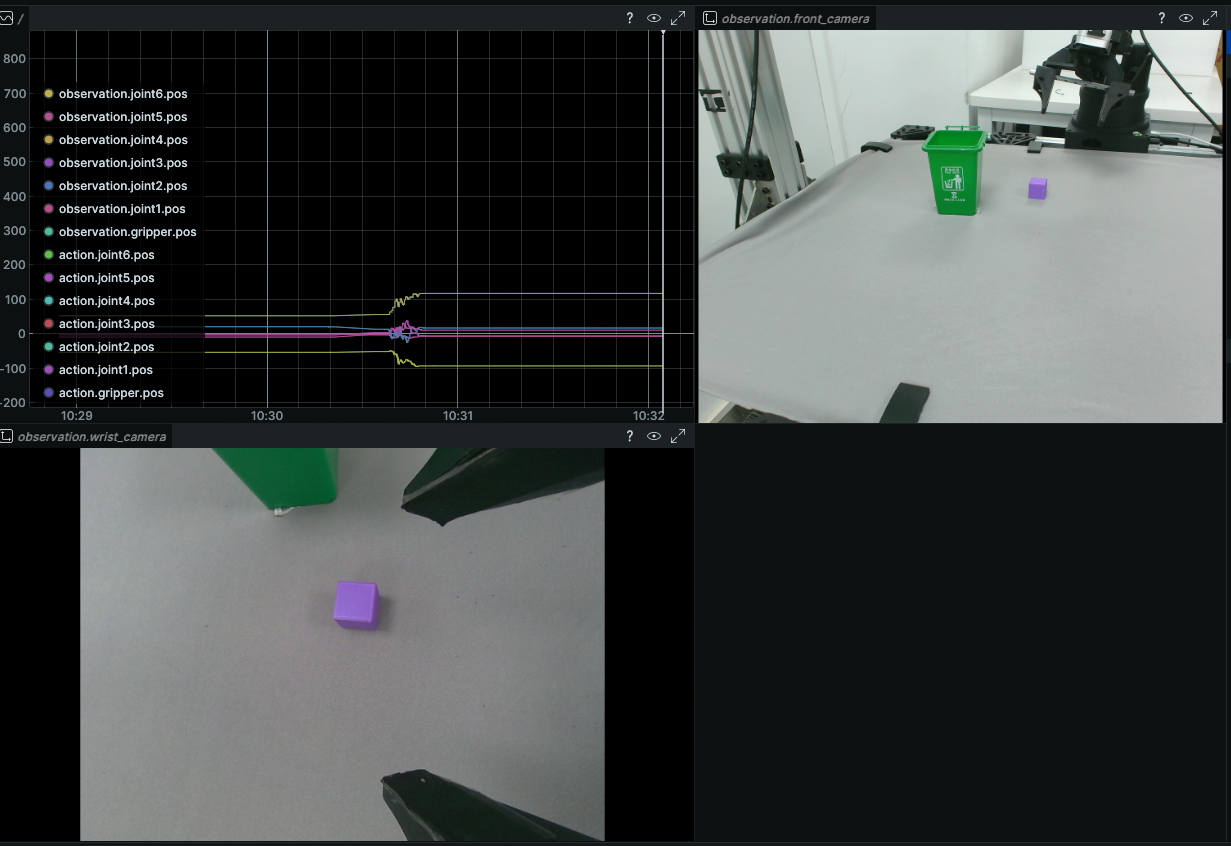
2.2.1 Obtaining Port Numbers
- Detect camera RGB port numbers:
cd lerobot
conda activate lerobot
python examples/camera/camera_detection.py
The following result is obtained:
Found 2 usable camera stream(s).
Press 'q' in the video window to cycle to the next camera.

Displaying Camera 1/2: TSTC USB20 WEB CAMERA on /dev/video7
Closing feed for TSTC USB20 WEB CAMERA.

Displaying Camera 2/2: Intel(R) RealSense(TM) Depth Ca (usb-0000 on /dev/video4
Closing feed for Intel(R) RealSense(TM) Depth Ca (usb-0000.

All camera streams have been shown. Exiting.
Record the RGB port numbers of the front camera and the wrist camera as 7/4, respectively.
- Detect robotic-arm port numbers:
- Linux:
ls /dev/ttyACM*
Connecting only the leader arm yields: /dev/ttyACM0;
Connecting both the leader arm and the follower arm yields: /dev/ttyACM0 /dev/ttyACM1, where the leader arm's port number is 0 and the follower arm's is 1.
- Windows:
Open "Device Manager" → expand "Ports (COM & LPT)" → look for a device name such as "USB-SERIAL CH340 (COM3)" or "Silicon Labs CP210x USB to UART Bridge (COM5)".
Or use the mode command (works in both CMD/PowerShell):
mode
Subsequent commands are primarily for Linux; Windows/macOS users can replace the corresponding robotic-arm/camera port numbers with the versions for their respective systems.
2.2.2 Connecting Only the Leader Arm
lerobot-record \
    --robot.type=alicia_d_follower \
    --robot.cameras='{
        front_camera: {type: opencv, index_or_path: /dev/video7, width: 640, height: 480, fps: 30},
        wrist_camera: {type: opencv, index_or_path: /dev/video4, width: 640, height: 480, fps: 30}
    }' \
    --robot.id=black \
    --teleop.type=alicia_d_leader \
    --teleop.id=leader_arm \
    --teleop.port=/dev/ttyACM0 \
    --teleop.use_action_as_observation=true \
    --dataset.repo_id=ubuntu/grab-cube-dataset1 \
    --dataset.root=/home/ubuntu/Data/LerobotData1 \
    --dataset.num_episodes=10 \
    --dataset.single_task="Grab the cube" \
    --dataset.episode_time_s=20 \
    --dataset.reset_time_s=5 \
    --display_data=true \
    --dataset.push_to_hub=false
--resume=true Add this line to continue collecting based on the current dataset.
2.2.3 Obtaining Leader-Arm and Follower-Arm Data Separately
lerobot-record \
    --robot.type=alicia_d_follower \
    --robot.port=/dev/ttyACM1 \
    --robot.cameras='{
        front_camera: {type: opencv, index_or_path: /dev/video7, width: 640, height: 480, fps: 30},
        wrist_camera: {type: opencv, index_or_path: /dev/video4, width: 640, height: 480, fps: 30}
    }' \
    --robot.id=black \
    --teleop.type=alicia_d_leader \
    --teleop.id=leader_arm \
    --teleop.port=/dev/ttyACM0 \
    --teleop.use_action_as_observation=false \
    --dataset.repo_id=ubuntu/grab-cube-dataset2 \
    --dataset.root=/home/ubuntu/Data/LerobotData2 \
    --dataset.num_episodes=10 \
    --dataset.single_task="Grab the cube" \
    --dataset.episode_time_s=20 \
    --dataset.reset_time_s=5 \
    --display_data=true \
    --dataset.push_to_hub=false
--teleop.directly_controls_robot=false Use this when the teleoperation sync cable is removed and the computer instead reads data from the leader arm to control the follower arm.
--resume=true Add this line to continue collecting based on the current dataset.
2.3 Dataset Training
lerobot-train \
    --dataset.repo_id=ubuntu/grab-cube-dataset1 \
    --dataset.root=/home/ubuntu/Data/LerobotData1 \
    --dataset.video_backend=pyav \
    --policy.type=act \
    --policy.push_to_hub=false \
    --output_dir=outputs/train/act_grab_cube \
    --job_name=act_grab_cube \
    --policy.device=cuda \
    --wandb.enable=true \
    --wandb.project=alicia-d-grasp-cube \
    --steps=50000 \
    --batch_size=32 \
    --save_freq=5000 \
    --log_freq=100 \
    --eval_freq=5000
Parameter selection:
--policy.type=act: Select the training model; act for ACT, diffusion for DP.
--dataset.repo_id=username/dataset_name: Dataset identifier.
--dataset.root=/path/to/parent/directory: The dataset path used for training. Try to use the same path as during collection.
--output_dir=/path/to/training_result: The output path for the trained model; this directory contains the different checkpoints.
Continue training
lerobot-train \
    --config_path=outputs/train/act_grab_cube/checkpoints/050000 \
    --dataset.repo_id=ubuntu/grab-cube-dataset \
    --dataset.root=/home/ubuntu/Data/LerobotData/test2 \
    --dataset.video_backend=pyav \
    --policy.type=act \
    --policy.device=cuda \
    --steps=100000 \
    --batch_size=32
2.4 Model Inference
Single-arm inference example:
python examples/alicia/eval_alicia_arms.py \
    --policy.path=outputs/train/act_grab_cube/checkpoints/last/pretrained_model \
    --robot.type=alicia_d_follower \
    --robot.port=/dev/ttyACM1 \
    --robot.cameras="{front: {type: opencv, index_or_path: /dev/video12, width: 640, height: 480, fps: 30}}" \
    --policy.device=cuda \
    --task="Grab the cube" \
    --duration=120 \
    --fps=10 \
    --num_episodes=5 \
    --record_eval=false
Key parameters:
--policy.path: Directory path of the trained policy checkpoint (e.g., outputs/train/act_grab_cube/checkpoints/last/pretrained_model or outputs/train/act_grab_cube/checkpoints/050000/pretrained_model)
--robot.port: The follower arm's serial port
--task: Task description (should match the task used during training)
--duration: Duration of each evaluation episode (seconds)
--fps: Action execution frequency (Hz)
--num_episodes: Number of evaluation episodes to run
--record_eval: Whether to record the evaluation episodes into a dataset (true or false)
--eval_dataset_repo_id: Dataset repository ID for recording evaluation episodes (required if record_eval=true)
3 Dual Teleoperation Kit: Object Grasping
Equipment/items used:
- Dual Alicia D teleoperation kit;
- Two C10 Synria cameras;
- Two D405 RealSense cameras;
- Object to be grasped;
- A storage box;
3.1 Hardware Connection
3.1.1 Connecting Only the Leader Arms
- Connect the D405 wrist cameras (wrist) and the C10 front and top cameras (front and top) to the computer
- Connect the two leader arms' data cables to the computer
- Connect the teleoperation sync cables between the leader arms and the follower arms
In this mode, both the follower arms' current state (Observation) and the given action (Action) are obtained through the leader arms' data cables, with a one-fps interval between them.
3.1.2 Obtaining Leader-Arm and Follower-Arm Data Separately
- Connect the D405 wrist cameras (wrist) and the C10 front and top cameras (front and top) to the computer
- Connect both the two leader arms' and the two follower arms' data cables to the computer
- Connect the teleoperation sync cables between the leader arms and the follower arms (optional)
In this mode, the follower arms' current state (Observation) and the given action (Action) are obtained from the follower arms' data cables and the leader arms' data cables, respectively.
3.2 Data Collection
3.2.1 Connecting Only the Leader Arms
lerobot-record \
    --robot.type=bi_alicia_d_follower \
    --robot.left_arm_connect=false \
    --robot.right_arm_connect=false \
    --robot.cameras='{
        right_wrist: {type: opencv, index_or_path: /dev/video10, width: 640, height: 480, fps: 30},
        left_wrist: {type: opencv, index_or_path: /dev/video18, width: 640, height: 480, fps: 30},
        top: {type: opencv, index_or_path: /dev/video24, width: 640, height: 480, fps: 30},
        front: {type: opencv, index_or_path: /dev/video12, width: 640, height: 480, fps: 30}
    }' \
    --robot.id=bimanual_black \
    --teleop.type=bi_alicia_d_leader \
    --teleop.id=bimanual_leader \
    --teleop.left_arm_port=/dev/ttyACM0 \
    --teleop.right_arm_port=/dev/ttyACM1 \
    --teleop.use_action_as_observation=true \
    --dataset.repo_id=ubuntu/grab-cube-bimanual-dataset1 \
    --dataset.root=/home/ubuntu/Data/LerobotData1 \
    --dataset.num_episodes=10 \
    --dataset.single_task="Grab the cube" \
    --dataset.episode_time_s=20 \
    --dataset.reset_time_s=5 \
    --display_data=true \
    --dataset.push_to_hub=false
--resume=true Add this line to continue collecting based on the current dataset.
3.2.2 Obtaining Leader-Arm and Follower-Arm Data Separately
lerobot-record \
    --robot.type=bi_alicia_d_follower \
    --robot.left_arm_port=/dev/ttyACM2 \
    --robot.right_arm_port=/dev/ttyACM3 \
    --robot.cameras='{
        right_wrist: {type: opencv, index_or_path: /dev/video10, width: 640, height: 480, fps: 30},
        left_wrist: {type: opencv, index_or_path: /dev/video18, width: 640, height: 480, fps: 30},
        top: {type: opencv, index_or_path: /dev/video24, width: 640, height: 480, fps: 30},
        front: {type: opencv, index_or_path: /dev/video12, width: 640, height: 480, fps: 30}
    }' \
    --robot.id=bimanual_black \
    --teleop.type=bi_alicia_d_leader \
    --teleop.id=bimanual_leader \
    --teleop.left_arm_port=/dev/ttyACM0 \
    --teleop.right_arm_port=/dev/ttyACM1 \
    --teleop.use_action_as_observation=false \
    --dataset.repo_id=ubuntu/grab-cube-bimanual-dataset2 \
    --dataset.root=/home/ubuntu/Data/LerobotData2 \
    --dataset.num_episodes=10 \
    --dataset.single_task="Grab the cube" \
    --dataset.episode_time_s=20 \
    --dataset.reset_time_s=5 \
    --display_data=true \
    --dataset.push_to_hub=false
--teleop.directly_controls_robot=false Use this when the teleoperation sync cable is removed and the computer instead reads data from the leader arm to control the follower arm.
--resume=true Add this line to continue collecting based on the current dataset.
3.3 Dataset Training
lerobot-train \
    --dataset.repo_id=ubuntu/grab-cube-bimanual-dataset1 \
    --dataset.root=/home/ubuntu/Data/LerobotData1 \
    --dataset.video_backend=pyav \
    --policy.type=act \
    --policy.push_to_hub=false \
    --output_dir=outputs/train/act_bimanual_grab_cube \
    --job_name=act_bimanual_grab_cube \
    --policy.device=cuda \
    --wandb.enable=true \
    --wandb.project=alicia-d-bimanual-grasp-cube \
    --steps=50000 \
    --batch_size=32 \
    --save_freq=5000 \
    --log_freq=100 \
    --eval_freq=5000
Parameter selection:
--policy.type=act: Select the training model; act for ACT, diffusion for DP.
--dataset.repo_id=username/dataset_name: Dataset identifier.
--dataset.root=/path/to/parent/directory: The dataset path used for training. Try to use the same path as during collection.
--output_dir=/path/to/training_result: The output path for the trained model; this directory contains the different checkpoints.
Continue training
lerobot-train \
    --config_path=outputs/train/act_bimanual_grab_cube/checkpoints/050000 \
    --dataset.repo_id=ubuntu/grab-cube-bimanual-dataset1 \
    --dataset.root=/home/ubuntu/Data/LerobotData1 \
    --dataset.video_backend=pyav \
    --policy.type=act \
    --policy.device=cuda \
    --steps=100000 \
    --batch_size=32
3.4 Model Inference
Dual-arm inference example
python examples/alicia/eval_alicia_arms.py \
    --policy.path=outputs/train/act_bimanual_grab_cube/checkpoints/last/pretrained_model \
    --robot.type=bi_alicia_d_follower \
    --robot.left_arm_port=/dev/ttyACM1 \
    --robot.right_arm_port=/dev/ttyACM0 \
    --robot.cameras='{
        right_wrist: {type: opencv, index_or_path: /dev/video10, width: 640, height: 480, fps: 30},
        left_wrist: {type: opencv, index_or_path: /dev/video18, width: 640, height: 480, fps: 30},
        top: {type: opencv, index_or_path: /dev/video24, width: 640, height: 480, fps: 30},
        front: {type: opencv, index_or_path: /dev/video12, width: 640, height: 480, fps: 30}
    }' \
    --policy.device=cuda \
    --task="Grab and handover the red cube to the other arm" \
    --duration=120 \
    --fps=10 \
    --num_episodes=5 \
    --record_eval=false
Key parameters:
--policy.path: Directory path of the trained policy checkpoint (e.g., outputs/train/act_bimanual_grab_cube/checkpoints/last/pretrained_model)
--robot.left_arm_port / --robot.right_arm_port: The follower arms' serial ports
--robot.cameras: Camera configuration (should match the training setup)
--task: Task description (should match the task used during training)
--duration: Duration of each evaluation episode (seconds)
--fps: Action execution frequency (Hz)
--num_episodes: Number of evaluation episodes to run
--record_eval: Whether to record the evaluation episodes into a dataset (true or false)
--eval_dataset_repo_id: Dataset repository ID for recording evaluation episodes (required if record_eval=true)
4 Key Parameters
LeRobot uses command-line parameters to configure data collection tasks. Below are some key parameters:
--robot.type=alicia_d: Specifies that the robot type we want to use is Alicia-D. If you need to use dual arms, set it to alicia_d_multi.
--control.type=record: Specifies that the task we want to perform is data recording.
--control.fps=30: Sets the frame rate of data recording (how many frames of data are captured per second). Recommended common values are 15 and 30.
--control.single_task="describe your task here": A brief description of the task you are demonstrating or recording, e.g., "The robotic arm grasps the red block and places it in the box".
--control.root=/path/to/your/datasets/my_alicia_dataset: Specifies which folder on the local computer the collected dataset is stored in. Make sure this path exists, or that LeRobot has permission to create it. Remember to change it when collecting a new dataset, otherwise an error will occur.
--control.repo_id=username/dataset_name: (Required) Specifies the dataset identifier. It must use the format username/dataset_name (e.g., my_user/alicia_demo). This format is required even if you do not upload to the Hugging Face Hub (--control.push_to_hub=false).
--control.num_episodes=10: How many "episodes" or "demonstrations" of data you want to record. For simple actions, 30–50 training runs are recommended; for more complex actions, multiple training runs are recommended.
--control.warmup_time_s=5: How many seconds to wait before each episode begins. This gives you time to prepare.
--control.episode_time_s=60: How long each episode is planned to record (seconds). It is recommended to leave some margin in the time setting.
--control.reset_time_s=30: After each episode ends, how much time you have to reset the scene or the robotic arm to its initial state.
--control.push_to_hub=false: Whether to automatically upload the dataset to the Hugging Face Hub after data collection is complete. For first-time use, it is recommended to set this to false.
--robot.port="": (Optional) Specifies the serial port to which the robotic arm is connected. Leave it empty to search automatically. If automatic search fails, set it manually: Linux example "/dev/ttyUSB0", Windows example COM3 (replace it with the actual port shown in Device Manager).
--control.display_data=true: (Optional) The GUI displays the collected data and the camera footage in real time; can be used for data-collection experiments.
--control.video=false: (Optional) Save the collected image data as video; it is recommended to set this to true at the early stage to observe whether the camera positions are reasonable.
--control.play_sounds=false: Start and end notification sounds.
5. Keyboard Shortcuts
Shortcuts during recording:
| Shortcut | Action |
|---|---|
| ← | Re-record the current episode |
| → | Skip the current stage early |
| ESC | Stop recording |
6. FAQ
- Port connection failed: Check using
lerobot-find-portand confirm the user is in thedialoutgroup - Camera initialization failed: Check the device using
ls /dev/video* - Video decoding error: Use
--dataset.video_backend=pyavduring training - CUDA out of memory: Reduce
--batch_size
For more details, please refer to lerobot/docs/Alicia_D_Usage_CN.md.