Alicia-D Follower Arm ROS1
1. Introduction
The Alicia-D follower arm control system is a complete ROS1-based solution, tailored specifically for the company's in-house Alicia series six-degree-of-freedom follower arm and gripper (reference: https://github.com/Synria-Robotics/Alicia-D-ROS1 ). The system provides standardized ROS interfaces, using radians as the unified angle unit, simplifying the robotic-arm control workflow, hiding low-level communication details, and allowing users to focus on developing upper-level applications. The system's core functions include:
-
Real-time control of the six-degree-of-freedom robotic arm;
-
Precise control of the gripper's opening and closing;
-
Provides an independent gripper control interface (new feature);
-
Real-time feedback of all joint states;
-
Provides standardized ROS interfaces;
-
Supports automatic serial-port detection and reconnection on disconnect;
-
Good cross-platform compatibility.
2. Reading Data from and Controlling a Single Follower Arm
Note:
Safety first: Always ensure there are no obstacles or other personnel within the robotic arm's working area;
Angle limits: All commands should be within the valid range; pay special attention to the gripper being limited to 0–100° (mechanical structure limit);
Data units: All APIs use radians as the unit, not degrees; you need to use
math.radians()andmath.degrees()for conversion;Startup order: Always start the control system first, then start the application;
Serial-port permissions: First-time use may require configuring serial-port access permissions;
System resources: Keep the ROS core system running normally;
Use Ctrl+C to safely stop a running node.
2.1 Interface Specification
The system uses alicia_d_driver_node for hardware communication, performing the data conversion between hardware data frames and standard joint states.
2.1.1 Driver Topics (Subscribe / Publish)
- Subscribe:
/joint_commands(sensor_msgs/JointState) - receives commands to control the robotic arm and gripper/demonstration(std_msgs/Bool) - robotic-arm torque on/off (teaching mode)/zero_calibrate(std_msgs/Bool) - robotic-arm zero-point calibration/default_speed_deg_s(std_msgs/Float64) - update the driver's default speed at runtime (degrees/second)
- Publish:
/joint_states(sensor_msgs/JointState) - publishes the current state of the robotic arm and gripper
2.1.2 Reading Joint States
rostopic echo /joint_states
2.1.3 Data Units and Limits
All angle values use radians as the standard unit:
| Parameter Name | Angle Range (radians) | Angle Range (degrees °) | Remarks |
|---|---|---|---|
| Joint1 | -2.16 to +2.16 | -123.7 to +123.7 | Base joint; values out of range are automatically clamped |
| Joint2 | -1.57 to +1.57 | -90 to +90 | Shoulder joint; values out of range are automatically clamped |
| Joint3 | -0.5 to +2.356 | -28.6 to +135 | Elbow joint; values out of range are automatically clamped |
| Joint4 | -3.14 to +3.14 | -180 to +180 | Wrist rotation joint; values out of range are automatically clamped |
| Joint5 | -1.57 to +1.5 | -90 to +85.9 | Wrist pitch joint; values out of range are automatically clamped |
| Joint6 | -3.14 to +3.14 | -180 to +180 | Wrist roll joint; values out of range are automatically clamped |
| Gripper | 0 to 1000 | 0 to 1000 (raw value) | Gripper opening/closing; 0=closed, 1000=fully open |
Note:
- In
/joint_commands, the gripper uses raw 0..1000 values (0=closed, 1000=open)- In
/joint_states, the gripper may be reported in different units, depending on the driver configuration
2.3 System Deployment and Startup
2.3.1 Installing System Dependencies
System dependencies:
-
Ubuntu 20.04
-
ROS (Noetic or another ROS 1 version) ROS installation:
wget http://fishros.com/install -O fishros && . fishros -
Python 3.8
-
rosdepc or rosdep
Creating the workspace and installing dependencies:
# Create the workspace
mkdir -p ~/alicia_ws/src
cd ~/alicia_ws
git clone https://github.com/Synria-Robotics/Alicia-D-ROS1.git -b v6.1.0 ./src/
# Install the dependency packages required by the library
./src/install/alicia_amd64_install.sh
Setting serial-port permissions
# Method 1: Add the user to the dialout group (recommended, permanent)
sudo usermod -a -G dialout $USER
# Note: You need to log out and log back in for the group permissions to take effect

# Method 2: Temporarily set serial-port permissions
sudo chmod 666 /dev/ttyACM*

# Method 3: Create a udev rule (permanent)
echo 'KERNEL=="ttyACM*", MODE="0666"' | sudo tee /etc/udev/rules.d/99-serial.rules
sudo udevadm control --reload-rules
sudo udevadm trigger
Hardware connection verification
-
Connect the robotic arm to the computer via USB;
-
Check whether the serial port is recognized by the system;
ls -l /dev/ttyACM*
- Confirm the serial-port device name (e.g., ttyUSB0, ttyUSB1, etc.).
2.3.2 Startup Command
Use the following command to start the complete control system:
roslaunch alicia_d_driver alicia_d_driver.launch
2.3.3 Configuration Parameters
The following parameters can be configured at startup:
# Specify the serial-port device (leave empty for automatic detection)
roslaunch alicia_d_driver alicia_d_driver.launch port:=/dev/ttyUSB1

# Set the default speed (degrees/second, range: 4.39-439.45)
roslaunch alicia_d_driver alicia_d_driver.launch default_speed_deg_s:=30.0

# Specify both the serial port and the default speed
roslaunch alicia_d_driver alicia_d_driver.launch port:=/dev/ttyUSB0 default_speed_deg_s:=20.0
2.3.4 Launch File Parameter Descriptions
| Parameter Name | Default Value | Description |
|---|---|---|
| port | "" (empty string) | Serial-port device name, located under /dev/. Leave empty for automatic detection of available serial ports |
| default_speed_deg_s | 20.0 | Default joint speed (degrees/second), range: 4.39-439.45 |
2.4 Usage Method
2.4.1 Enable / Disable Teaching Mode (Zero Torque)
Enable (enter drag-teaching / manual-drag mode):
rostopic pub -1 /demonstration std_msgs/Bool "data: true"
Disable (restore full torque):
rostopic pub -1 /demonstration std_msgs/Bool "data: false"
2.4.2 Zero-Point Calibration
⚠️ Note: This operation is irreversible; please skip this step unless necessary.
Step 1: First disable the torque (enter teaching mode)
rostopic pub -1 /demonstration std_msgs/Bool "data: true"
Step 2: Manually move the robotic arm to the desired zero-point posture
Step 3: Perform zero-point calibration (torque is automatically restored after calibration)
rostopic pub -1 /zero_calibrate std_msgs/Bool "data: true"
2.4.3 Sending Joint Commands
Send joint position and (optional) velocity commands via /joint_commands:
Example 1: Move using the default speed (driver default_speed_deg_s)
rostopic pub -1 /joint_commands sensor_msgs/JointState "
name: ['Joint1','Joint2','Joint3','Joint4','Joint5','Joint6','Gripper']
position: [0.5, 0.1, 0.0, 0.0, 0.1, 0.0, 500.0]
"
Example 2: Move with a specified speed limit (30 degrees/second = 0.524 radians/second)
rostopic pub -1 /joint_commands sensor_msgs/JointState "
name: ['Joint1','Joint2','Joint3','Joint4','Joint5','Joint6','Gripper']
position: [0.5, 0.1, 0.0, 0.0, 0.1, 0.0, 500.0]
velocity: [0.524, 0.524, 0.524, 0.524, 0.524, 0.524, 0.0]
"
Controlling the gripper independently:
# Open the gripper to 50% (500)
rostopic pub -1 /joint_commands sensor_msgs/JointState "
name: ['Gripper']
position: [500.0]
"

# Fully close the gripper
rostopic pub -1 /joint_commands sensor_msgs/JointState "
name: ['Gripper']
position: [0.0]
"

# Fully open the gripper
rostopic pub -1 /joint_commands sensor_msgs/JointState "
name: ['Gripper']
position: [1000.0]
"
Unit Notes (Important)
/joint_commands uses sensor_msgs/JointState (ROS standard convention):
positionjoint position unit is radians (rad)velocityvelocity unit is radians/second (rad/s)
Driver behavior:
- If
velocity(rad/s) is provided, the driver automatically converts it to deg/s and takes the maximum value as the common speed limit for all joints - If
velocityis not provided, the driver usesdefault_speed_deg_s(deg/s) - The gripper command in
/joint_commandsis raw 0..1000 (0=closed, 1000=open)
Speed conversion reference:
- 20 degrees/second = 0.349 radians/second
- 30 degrees/second = 0.524 radians/second
- 40 degrees/second = 0.698 radians/second
- 100 degrees/second = 1.745 radians/second
2.4.4 Updating the Driver's Default Speed at Runtime
# Set the default speed to 20 degrees/second
rostopic pub -1 /default_speed_deg_s std_msgs/Float64 "data: 20.0"

# Set the default speed to 30 degrees/second
rostopic pub -1 /default_speed_deg_s std_msgs/Float64 "data: 30.0"
2.5 Detailed Example
The system provides a complete demonstration example for testing and learning:
# Make sure the system is started
roslaunch alicia_d_driver alicia_d_driver.launch

# Run the demonstration program
rosrun alicia_d_driver arm_control_test.py
The demonstration program will execute the following test sequence:
-
Zero all joints;
-
Test the forward and reverse motion of Joint 1;
-
Test the forward and reverse motion of Joint 2;
-
Test the gripper opening and closing;
-
Test a compound action.
2.6 Troubleshooting
2.6.1 Common Issues
| Problem Description | Possible Cause | Solution |
|---|---|---|
| Cannot connect to the serial port | Insufficient permissions | Use sudo chmod 666 /dev/ttyUSB* or add the user to the dialout group |
| Serial-port connection failed | Incorrect port name | Check the available devices under /dev and specify the correct port parameter |
| Communication interrupted | Unstable USB connection | Use a high-quality USB cable and check whether the USB interface is loose |
| Robotic arm not responding | Incorrect baud rate | Confirm the baud rate setting matches the hardware (default 921600) |
| Limited range of motion | Software limit | Check whether the angle limits in the code match the actual mechanism |
| Abnormal gripper behavior | Out of range | Ensure the gripper angle is within the 0–100 degree range |
2.6.2 Diagnostic Methods
Enabling debug mode can provide more information:
roslaunch alicia_d_driver alicia_d_driver.launch debug_mode:=true
Check the service node status:
rosnode list
rosnode info /alicia_d_driver_node
Monitor raw data:
rostopic echo /joint_states
3. MoveIt! and ROS Control Control of a Single Follower Arm
3.1 Startup Command
MoveIt simulation control, without connecting to a real robotic arm:
roslaunch alicia_d_moveit demo.launch
MoveIt and ROS Control control connected to a real robotic arm:
roslaunch alicia_d_driver alicia_d_bringup.launch
3.2 MoveIt Configuration Modification
The alicia_d_moveit ROS package configures the alicia motion-control planning group and the manipulator motion-control planning group.
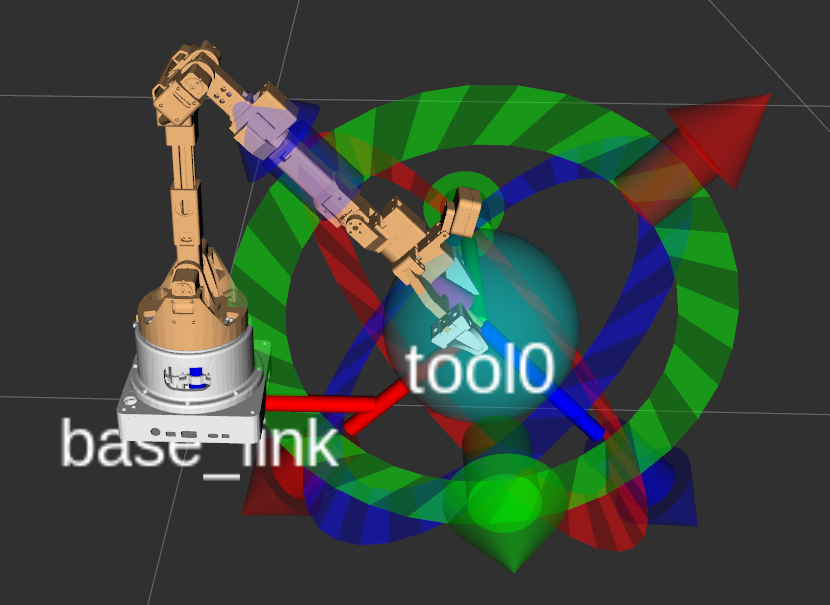
Aliciaplanning group
Contains the forward/inverse kinematics planning from base_link to tool0, i.e., a series of coordinate transformation relationships from the robotic-arm base to the midpoint of the gripper tip.
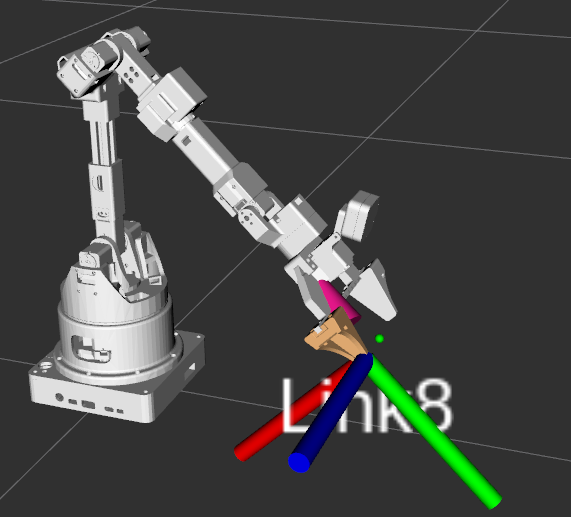
Gripperplanning group
Gripper control; the right_finger corresponding to Link8 drives the left_finger to translate.
Adding or removing planning control groups and other parameters is mainly done through the MoveIt Assistant; run the following command to launch it:
roslaunch moveit_setup_assistant setup_assistant.launch
4. Zero Calibration of a Single Follower Arm
If you observe that, after launching alicia_d_bringup.launch, the robotic arm's motion state in RViz is inconsistent with the actual robotic arm, this is mainly caused by a mismatch between the robotic arm's set zero-point position and MoveIt, and the robotic arm's zero point needs to be re-adjusted.
It is mainly divided into two steps:
-
The robotic arm enters the 0-torque state;
-
Set the target posture;
-
Run the zero-calibration code.
4.1 Step 1
Run the robotic arm's ROS hardware-communication code:
roslaunch alicia_d_driver alicia_d_driver.launch
Run the command in the terminal to control with 0 torque (in the torque-free state, the robotic arm cannot maintain its current posture; please pay attention to safety):
rostopic pub /demonstration std_msgs/Bool "data: true"
After success, press ctrl-C to end the publishing command.
4.2 Step 2
Place the robotic arm at the target zero-point position:

Keep position 1 vertical, position 2 at a 45-degree angle, and position 3 parallel.
4.3 Step 3
Run the zero-calibration code:
cd ~/alicia_ws/src/examples/
python3 alicia_d_zero_calibration.py
When the robotic arm returns to the full-torque state, it indicates that the zero calibration is complete.
5. Drag Teaching of a Single Follower Arm
5.1 Startup Command
roslaunch alicia_d_driver alicia_d_driver.launch
In another terminal
roslaunch alicia_d_drag_teaching drag_teaching.launch
Before running
drag_teaching.launch, it is recommended to hold a suitable position on the upper end of the robotic arm to prevent it from colliding with the desk after the torque is set to 0.
5.2 Stopping Drag Teaching
Ways to stop drag teaching:
-
Automatically stops recording after reaching the set maximum time;
-
Interrupt by pressing the
skey;
The set duration is modified in the initialization of the PoseRecorder class in pose_record.py.
class PoseRecorder:
    """ROS node class for recording robot joint poses"""

    def __init__(self):
        """Initialize the pose recorder node"""
        rospy.init_node('pose_recorder', anonymous=True)

        # Get the recording duration parameter
        self.record_duration = 10  # Record 10 seconds by default
    ...
After completing the recording, you can press Enter to choose real-time pose restoration.
Or press any other key to exit, and run:
python3 pose_replicator.py
This can also restore the pose; the restored data is from the previous teaching record stored in pose_data.bag in the same directory.
5.3 Demonstration of Results
The terminal's run results are as follows:
[INFO] [1746864088.321231]: 姿态记录器已初始化,正在监听 /arm_joint_state 主题
[INFO] [1746864088.323308]: 按 's' 键停止记录并保存数据
[INFO] [1746864089.830843]: 已开始记录关节状态,数据将保存到: ....../alicia_d_drag_teaching/script/pose_data.bag
s
[INFO] [1746864096.982006]: 已停止记录
[INFO] [1746864096.986897]: --------------------------------------------------------------------------------
[INFO] [1746864096.996564]: 主题: /recorded_arm_joint_state
[INFO] [1746864096.998525]: 消息类型: alicia_d_driver/ArmJointState
[INFO] [1746864097.000337]: 消息数量: 598
[INFO] [1746864097.002062]: 开始时间: 1746864089.8384588
[INFO] [1746864097.003416]: 结束时间: 1746864096.975816
[INFO] [1746864097.004634]: 持续时间: 7.14 秒
[INFO] [1746864097.005741]: --------------------------------------------------------------------------------
[INFO] [1746864097.006784]: 前5条消息预览:
[INFO] [1746864097.014022]: [1746864089.8384588] J1=-0.0966, J2=-0.4019, J3=0.5323, J4=0.0138, J5=0.4878, J6=0.0077, Gripper=0.0102
[INFO] [1746864097.014769]: [1746864089.8501806] J1=-0.0966, J2=-0.4111, J3=0.5369, J4=0.0138, J5=0.4863, J6=0.0077, Gripper=0.0102
[INFO] [1746864097.015336]: [1746864089.8617556] J1=-0.0966, J2=-0.4203, J3=0.5430, J4=0.0138, J5=0.4863, J6=0.0077, Gripper=0.0102
[INFO] [1746864097.015824]: [1746864089.873515] J1=-0.0966, J2=-0.4326, J3=0.5492, J4=0.0138, J5=0.4863, J6=0.0077, Gripper=0.0102
[INFO] [1746864097.016265]: [1746864089.8853006] J1=-0.0966, J2=-0.4433, J3=0.5553, J4=0.0138, J5=0.4863, J6=0.0077, Gripper=0.0102
[INFO] [1746864097.016673]: ... (总共 598 条消息)
[INFO] [1746864097.017077]: --------------------------------------------------------------------------------
[INFO] [1746864097.018954]: 正在关闭拖动示教模式...
[INFO] [1746864098.521311]: --------------------------------------------------------------------------------
[INFO] [1746864098.524080]: 记录已完成,是否要执行姿态还原?
[INFO] [1746864098.526465]: 按 Enter 键启动姿态还原,按其他键退出...
[INFO] [1746864103.597721]: 启动姿态还原...
[INFO] [1746864103.606679]: 姿态还原节点启动命令已发送
[INFO] [1746864103.609799]: 姿态记录器退出...
[INFO] [1746864104.046068]: 姿态复制器初始化完成
[INFO] [1746864104.050654]: 执行速度因子: 1.00
[INFO] [1746864104.086647]: 成功读取 598 个轨迹点
[INFO] [1746864104.087331]: 按 Enter 键开始执行轨迹...
[INFO] [1746864107.390125]: 开始执行轨迹,总时长:7.14秒
[INFO] [1746864115.534549]: 轨迹执行完成
[INFO] [1746864115.537771]: 轨迹执行完成
6. 2D Grasping with a Single Follower Arm
6.1 Environment Setup
Equipment used:
-
Alicia D single follower arm;
-
Synria camera;
-
A4 paper
-
Green/blue cube (2 cm × 2 cm)
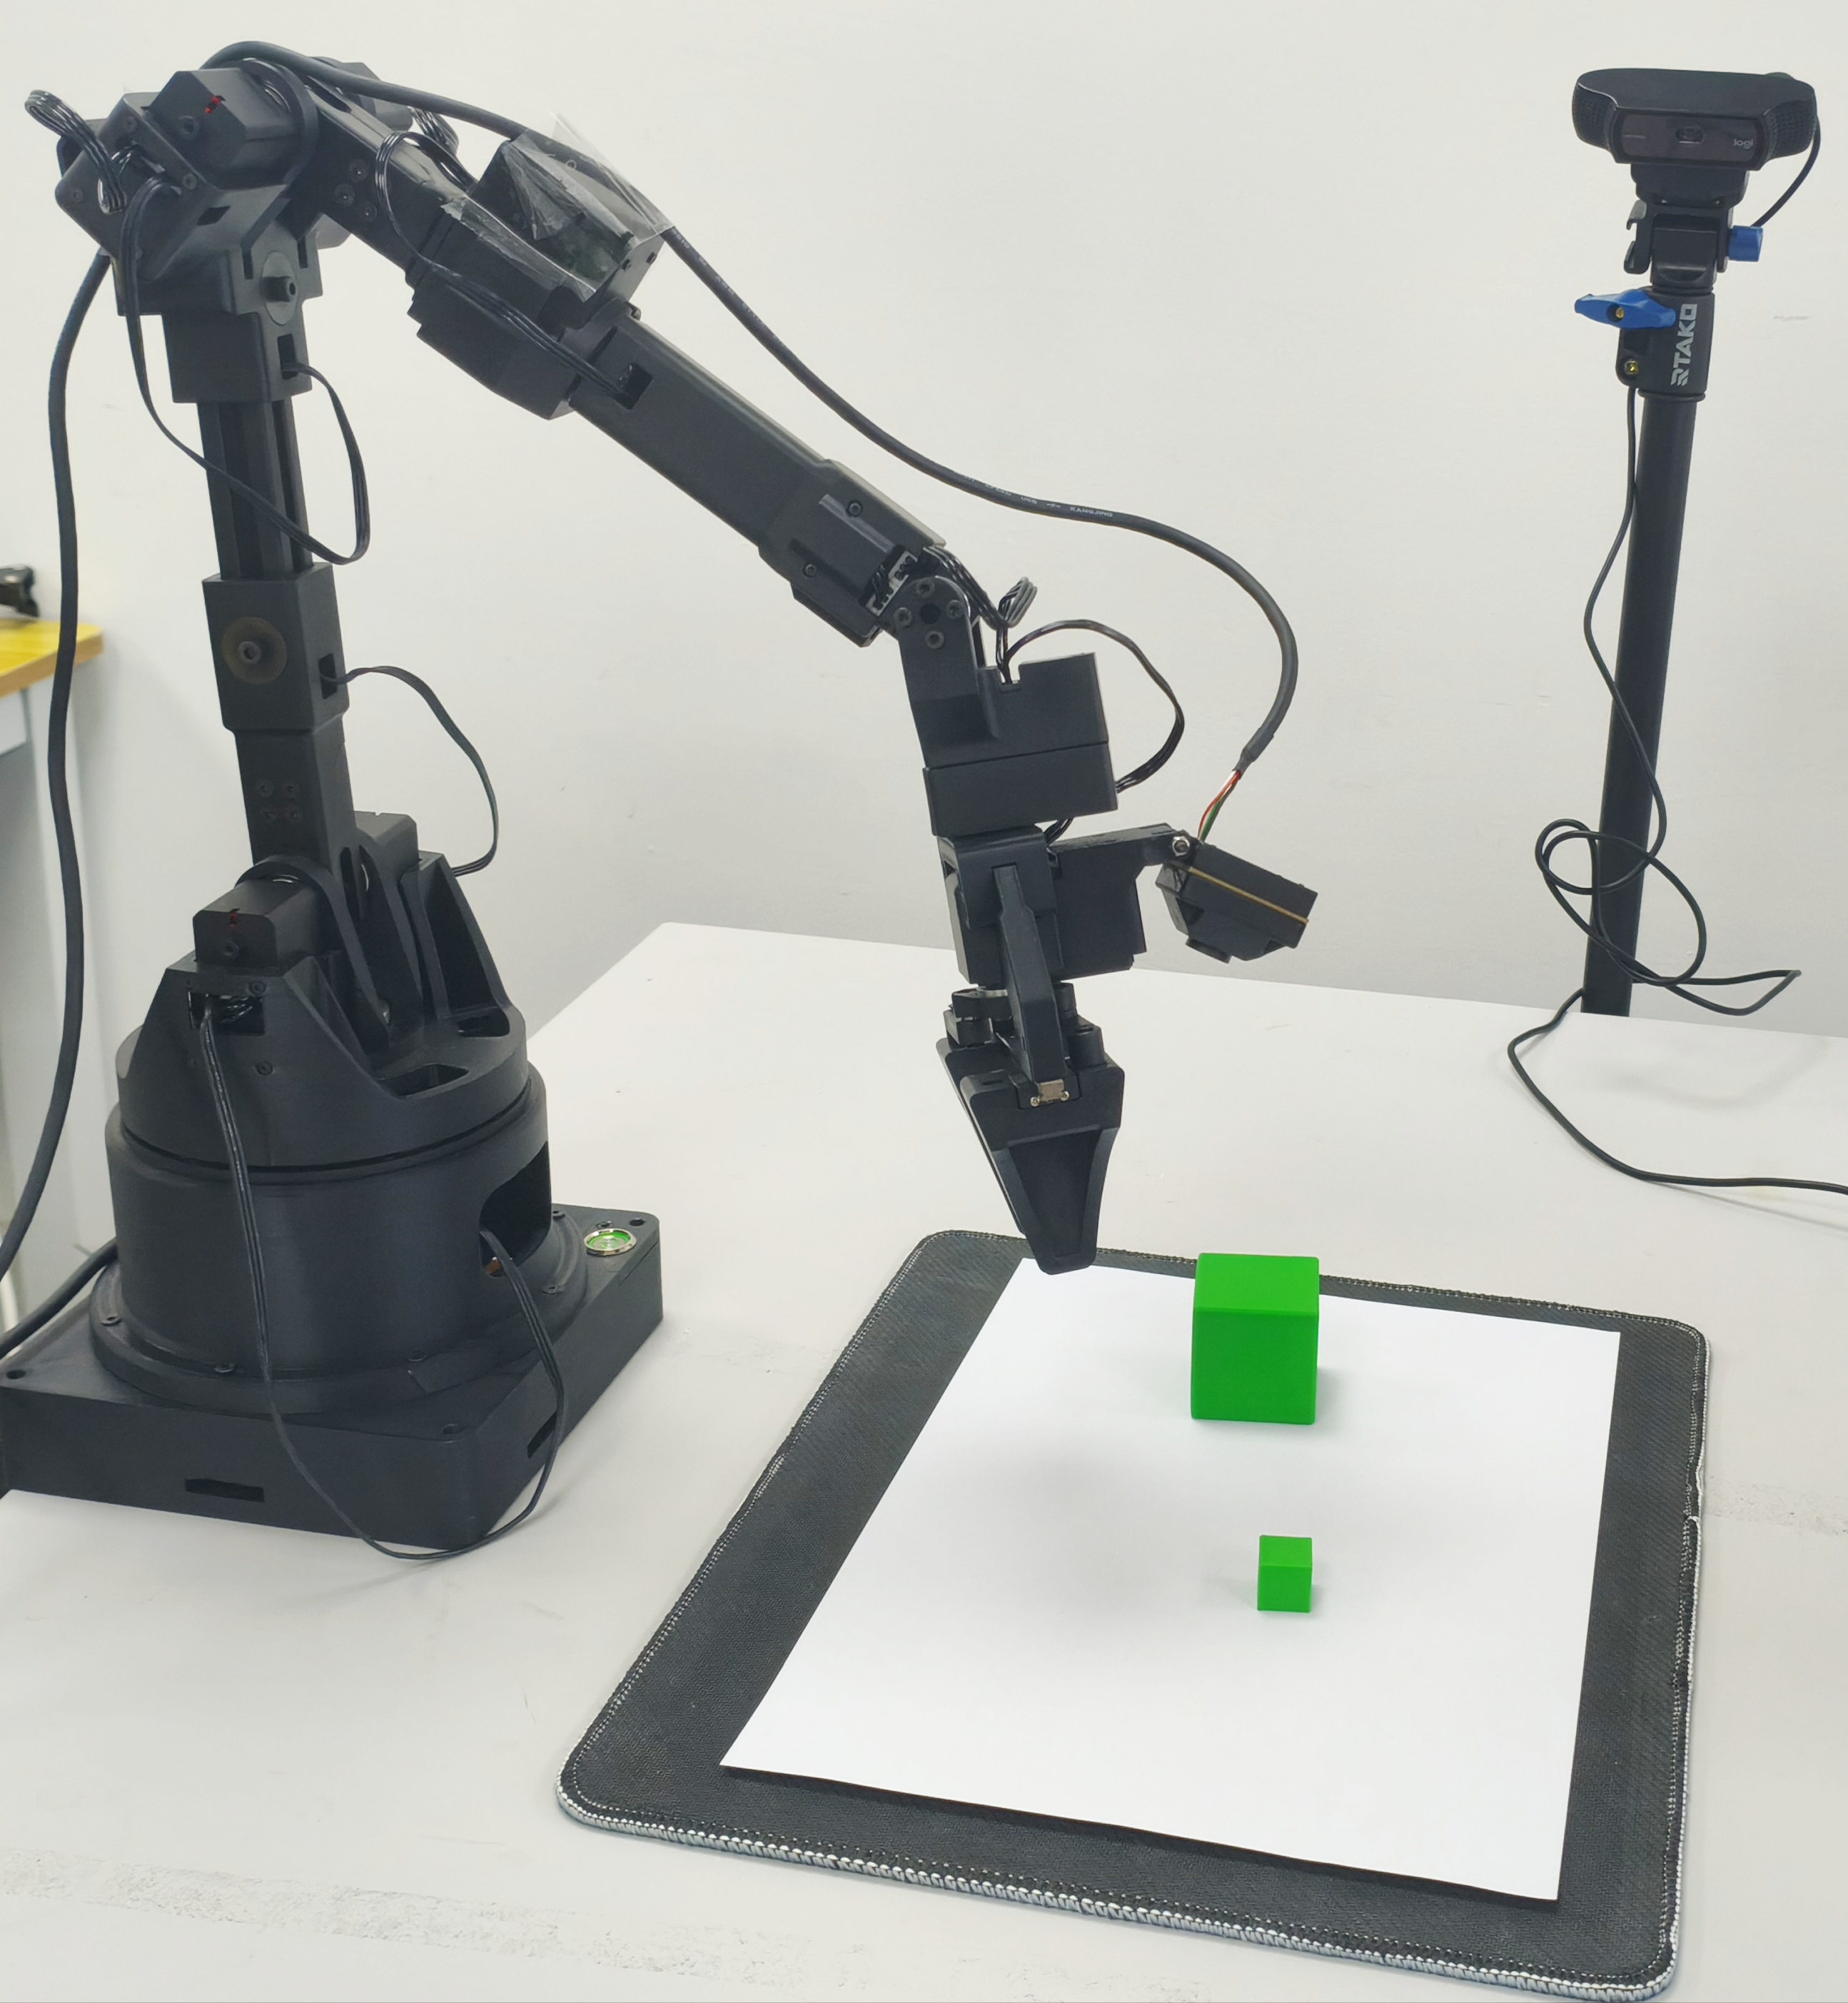
Note: Only the Synria camera on the robotic arm in the figure is needed.
6.1.1 Setting Up the Grasping Area
Prepare a sheet of A4 paper and place it on a flat mat/desk with relatively high contrast against white.
6.1.2 Camera Preparation
Fix the camera on the robotic arm's camera clip, ensuring it does not wobble. The camera needs to include an RGB lens capable of reading out RGB images.
6.2 Camera Parameter Calibration
For details, see the Synria Technology - Hands-On AI + Robotics course series
6.2 Configuration Modification
Predefined Placement Positions
You may need to modify the following predefined positions in cube_sorting.py to match your setup:
# Predefined positions
self.HOME_POSITION = [0.5101731659675737, -0.1741493363528409, 1.1561367836287713, 0.03145428542055679, -1.5228477209708768, -0.5163105875130477]

self.DROP_ZONE_POSITION = [1.4139084885387032, 0.08822543471619682, 0.33985971808065407, 0.046797839284243144, -1.2804195699246312, -1.3249158761293214]
self.DROP_ZONE_POSITION_2 = [1.3218471653565846, -0.24012661796669224, 0.8032350447639837, -0.026851219261451377, -1.4292520424023896, -1.1837551805834068]
Program Startup
- Start Robot Control
In terminal 1:
roslaunch alicia_d_driver alicia_d_bringup.launch
- Start Object Detection
In terminal 2:
roscd alicia_d_object_sort/scripts
python3 camera_obj_detection.py
- Start Cube Sorting
In terminal 3:
roscd alicia_d_object_sort/scripts
python3 cube_sorting.py
Configuration
Predefined Positions
You may need to modify the following predefined positions in cube_sorting.py to match your setup:
# Predefined positions
self.HOME_POSITION = [0.5101731659675737, -0.1741493363528409, 1.1561367836287713, 0.03145428542055679, -1.5228477209708768, -0.5163105875130477]

self.DROP_ZONE_POSITION = [1.4139084885387032, 0.08822543471619682, 0.33985971808065407, 0.046797839284243144, -1.2804195699246312, -1.3249158761293214]
self.DROP_ZONE_POSITION_2 = [1.3218471653565846, -0.24012661796669224, 0.8032350447639837, -0.026851219261451377, -1.4292520424023896, -1.1837551805834068]
Finding the Poses You Need:
- Use MoveIt's interactive markers to drag the robot end-effector
- Record the corresponding robot joint states
- Update the position values in the code
7. 6D Grasping with a Single Follower Arm
7.1 Environment Setup
Equipment used:
-
Alicia d single follower arm;
-
ORBBEC camera;
-
A cube

7.1.1 Preparing the Object to Grasp
Prepare an appropriately sized object for grasping.

7.1.2 Camera Preparation
Fix the camera position using a camera mount or other tools, ensuring the camera's field of view covers the grasping area to be identified.
The camera needs to include an RGB lens capable of reading out RGB and depth images.
7.2 Camera Extrinsic Calibration
For details, see the Synria Technology - Hands-On AI + Robotics course series
7.3 Prerequisites
-
GPU (check with nvidia-smi)
-
Anaconda3 or Miniconda3
-
CUDA Toolkit (check with nvcc --version)
7.4 Conda Environment Configuration
- Conda environment creation and basic library installation
conda create -n grasp python=3.8
conda activate grasp
conda install pytorch torchvision torchaudio pytorch-cuda=11.8 -c pytorch -c nvidia
MinkowskiEngineinstallation
cd ~/alicia_ws/src/alicia_d_grasp_6d
git clone https://github.com/NVIDIA/MinkowskiEngine.git
cd MinkowskiEngine
export CXX=g++-7
python setup.py install --blas_include_dirs=${CONDA_PREFIX}/include --blas=openblas
For details, refer to https://github.com/NVIDIA/MinkowskiEngine
graspnetAPIinstallation
pip install graspnetAPI
For details, refer to https://github.com/graspnet/graspnetAPI
graspness_implementationinstallation
cd cd ~/alicia_ws/src
git clone https://github.com/rhett-chen/graspness_implementation ./alicia_d_grasp_6d/
cd alicia_d_grasp_6d/pointnet2
python setup.py install # install pointnet2 packg
cd ../knn
python setup.py install # install knn package
For details, refer to https://github.com/rhett-chen/graspness\_implementation
7.5 Startup Command
Start robotic-arm control and the camera:
roslaunch alicia_d_driver serial_server.launch
roslaunch alicia_d_moveit real_robot_control.launch camera_load:=true2
Because the graspness model's object recognition and grasp prediction have been trained, you can directly invoke the trained checkpoint file to predict the target object's pose and the optimal grasp pose.
cd ~/alicia_ws/src/alicia_d_grasp_6d/
conda activate grasp
python alicia_grasp.py